


Mastering the squat can increase your strength in the gym and lead to success in powerlifting and weightlifting competitions. But how do you progress from a beginner to an advanced squatter?
Follow these 10 squat progression exercises:
- Assisted Squat
- Stability Ball Wall Squat
- Bodyweight Squat To Box
- Goblet Squat
- Split Squat
- Bulgarian Split Squat
- Front Rack Squat
- Barbell Back Squat To Box
- Barbell Front Squat
- Barbell Back Squat
I use several movement patterns with my athletes to go from a beginner level to an advanced squatter. In this article, I’ll discuss exactly how to perform each squat progression and how to progress to the next advanced variation to master a barbell back squat.
Check out my complete list of 20 Exercises That Improve Squat Strength.
Table of Contents
Squat Progressions: 10 Exercises
The following progressions are listed in order from beginner to more advanced variations of the squat:
1. Assisted Squat
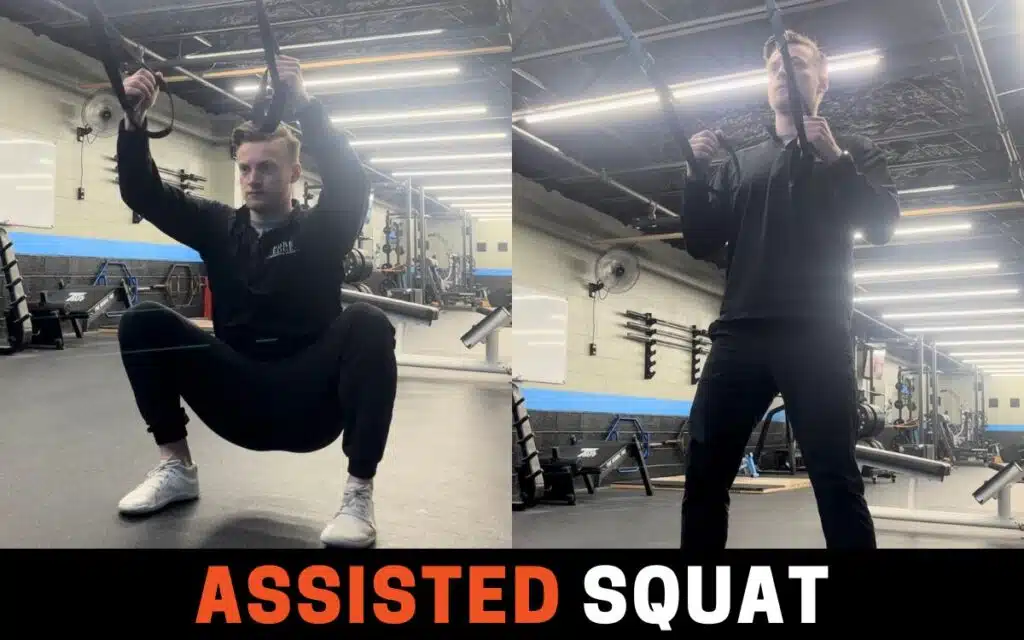
An assisted squat should be the base layer for anyone learning to master a squat. While assisted, the focus is mostly on form and depth, so make sure to get comfortable in a full range of motion squat here.
How To Do It:
- Hold onto TRX straps, a countertop, or anything with a stable base at your home that is about chest height
- Keep your feet shoulder-width apart with your knees screwed to the outside
- Descend by pushing your hips back like you are sitting in a chair
- Keep your chest tall during the entire movement. If there was a mirror in front of you, you should be able to see your chest in the mirror the entire time
- Aim to get your hip crease below the level of your knees
- Hold the bottom position for a count of 2, then return to the starting position
Interested in competing in Powerlifting but wondering if you’re strong enough? Check out our article on How Strong You Need To Be At Your First Powerlifting Meet.
2. Stability Ball Wall Squat
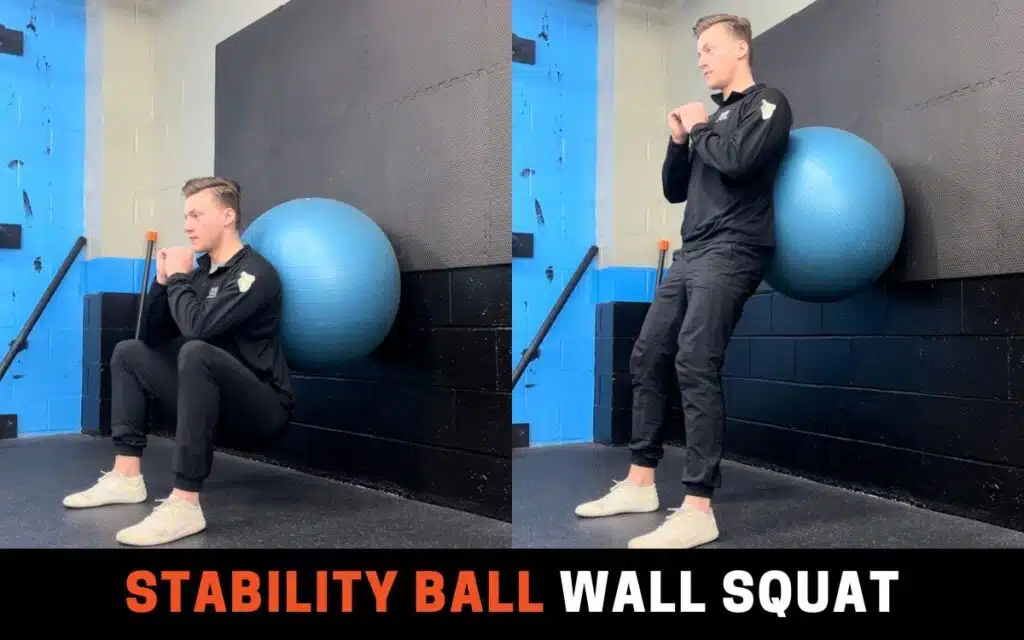
The next progression for learning the squat is the stability ball wall squat because there is slightly less assistance, but our bodyweight is still supported by the ball.
How To Do It:
- Place the stability ball on the wall at chest height
- Position the stability between the shoulder blades
- Have the feet placed at hip width or slightly wider
- Keep the back pressed into the stability ball, and bend at the knees to squat down
- The knees should remain in line with the toes throughout the movement (avoid knees caving inward)
- Aim to get the thighs parallel with the ground at the bottom of the squat
- Push through the legs out of the bottom of the squat to return to standing
Wondering how to get your body ready to squat? Check out our guide on How To Warm Up For Squats
3. Bodyweight Squat To Box
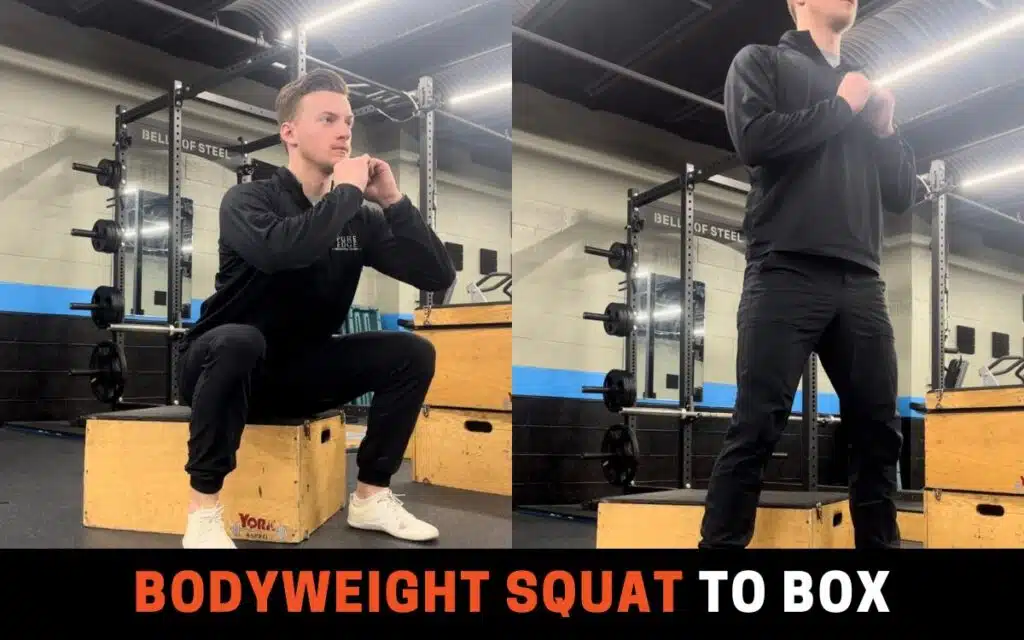
Bodyweight box squats give the lifter a target depth to allow for additional support and to provide feedback on how low to squat.
How To Do It:
- Stand in front of a box or bench with feet hip-width apart or wider
- Maintain proximity to the box
- Keep the knees in line with the toes while allowing the hips to travel backward as the knees track forwards
- Maintain a neutral spine by resisting back arching or rounding
- Lightly touch the bench without completely relaxing on it
- After contact with the bench, push through the legs to come to standing
- At the top of each squat, ensure the hips return to a stacked position under the shoulders
This movement can be progressed by reducing the height of the box or bench that we are using. Don't have a box? Try a box squat alternative.
4. Goblet Squat

The initial step to loading the squat pattern is the goblet squat, which loads the lifter anteriorly (typically easier for most beginners) without worrying about the front rack position that comes with more advanced exercises like the front squat.
How To Do It:
- Hold a dumbbell or kettlebell against the chest with wrists in a neutral position
- Stand with feet hip-width apart or wider
- Initiate the squat by allowing the hips to travel backward as the knees track forwards
- Maintain a neutral spine by resisting back arching or rounding
- Aim to squat parallel or slightly lower without compromising the neutral spine position
- Once full depth is attained, push through the floor with the legs to initiate the ascent
- Keep the knees in line with the toes (do not let the knees cave inward), and ensure the hips and shoulders are rising at the same rate
- Finish the squat by returning the hips and knees to a stacked position under the shoulders
Curious about how many squats to do during each set? Check out our article Best Rep Ranges For Squats: Science-Backed to find out.
5. Split Squat

The split squat is an intermediate-level unilateral squat variation that we can use in our workouts to build unilateral strength and ankle mobility and to challenge the stabilizing muscles.
How To Do It:
- Stand with feet shoulder-width apart
- Step one foot directly forward and the other foot directly backward – this is the start position
- Bend both legs at the knee until the back knee hovers just above the ground
- The knees should be around 90 degrees at the bottom of the split squat
- Once proper depth has been achieved, push through the front leg to return to the start position
- An equal number of sets and reps should be performed with both the left and right leg in front
We can increase the intensity of this movement by holding dumbbells or kettlebells to add an external load.
Split squats are an exercise that I have used to get stronger legs to progress my squat numbers. Read more about the best 20 Exercises To Improve Squat Strength.
6. Bulgarian Split Squat
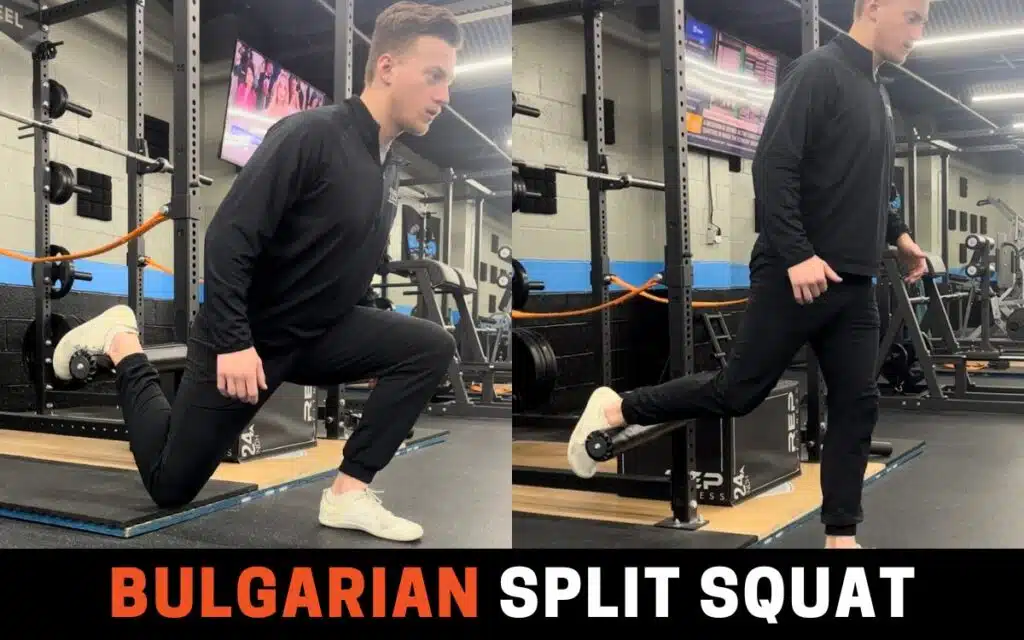
The BSS is a single-leg squat variation progression from the traditional split squat. Elevating the back foot onto a bench increases the range of motion and challenges core stability.
How To Do It:
- Position your rear foot on a roller or bench behind you
- Walk your front foot forward 2-3 steps from the bench
- Bend at both knees so your rear knee hovers just above the floor
- Once depth is achieved, drive into the floor with your front leg, making sure the hips and chest rise simultaneously
- An equal number of sets and reps should be performed with both the left and right leg in front
The Bulgarian split squat is one exercise I use with my clients to break through a squat plateau. Check out our full breakdown on how to Break Through A Squat Plateau.
7. Front Rack Squat
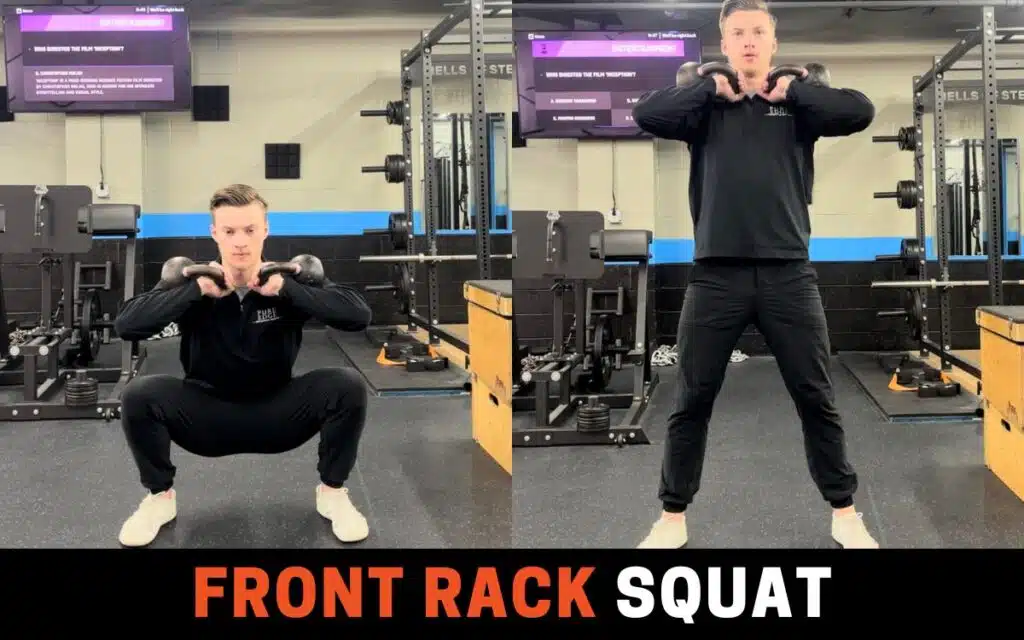
The front rack squat requires the lifter to maintain proper squat technique while challenging the core. Adding an anterior load in the front rack position will pull the torso down, so the lifter now has to focus more on core stability.
How To Do It:
- Hold a kettlebell in each arm so the bell is against the top of the wrist. Bring both elbows up just above shoulder height with your knuckles facing each other
- Stand with feet shoulder-width apart and keep your knees rotated to the outside
- While maintaining the same position with your arms through the entire motion, push your hips back like you are sitting in a chair until your hip crease is below the level of your knees
- Drive both feet onto the floor to push yourself back to the starting position
The core is an important group of muscles during a squat. Learn more in our complete guide of all the Muscles Worked During A Squat.
8. Barbell Back Squat To Box

The barbell back squat increases the difficulty by challenging core positioning because we are loading posteriorly, which can cause the back to arch in beginner lifters. To assist in mastery of this technique, we can start by limiting the range of motion by squatting to a box or bench.
- Using a rack, set the pins at a level that allows the barbell to rest at shoulder height
- Have the box or bench close enough to the rack that it is possible to unrack the bar and take a step backward (to adjust the feet) before contacting the box
- Place hands at equal distances on the bar and walk underneath the bar to place it on the upper traps
- Unrack the bar by stacking the hips under the shoulders and standing up
- Step back until the feet are almost touching the box or bench, and set the feet at hip width or slightly wider
- Initiate the squat by allowing the hips to travel backward as the knees track forwards
- Maintain a neutral spine by resisting back arching or rounding
- Once light contact with the box occurs, maintain tension in the legs and push through the floor to initiate the ascent
- Keep the knees in line with the toes (do not let the knees cave inward), and ensure the hips and shoulders are rising at the same rate
- Finish the squat by returning the hips and knees to a stacked position under the shoulders
To learn more about the differences between the Box Squat and the Back Squat progressions, check out our article on Box Squat vs Back Squat.
9. Barbell Front Squat

The front squat is a more advanced progression because it requires mobility at the ankles, hips, thoracic spine, lats, and wrists to attain the proper positions. This is my personal favorite squat variation because it challenges full body strength and stability.
- Using a rack, set the pins at a level that allows the barbell to rest at shoulder height
- Place the fingertips of each hand at an equal distance on the bar and rotate the elbows under the bar. The bar should rest on the fingertips, and the triceps should be parallel to the ground
- The bar should sit between the front delt and the neck and be actively pressed up off the collarbone by keeping elbows high
- Unrack the bar by stacking the hips under the shoulders and standing up
- Step back and set the feet at hip width or slightly wider
- Initiate the squat by allowing hips to travel backwards as the knees track forwards
- Strive for a vertical (or near-vertical) torso position, and maintain neutral spine by resisting back arching or rounding
- Once adequate depth is reached, maintain tension in the legs and push through the floor to initiate the ascent
- Keep the knees in line with the toes (do not let the knees cave inward) and ensure the hips and shoulders are rising at the same rate
- Finish the squat by returning the hips and knees to a stacked position under the shoulders
If you want to learn everything you need to know about the front squat, check out our Ultimate Front Squat Guide.
10. Barbell Back Squat
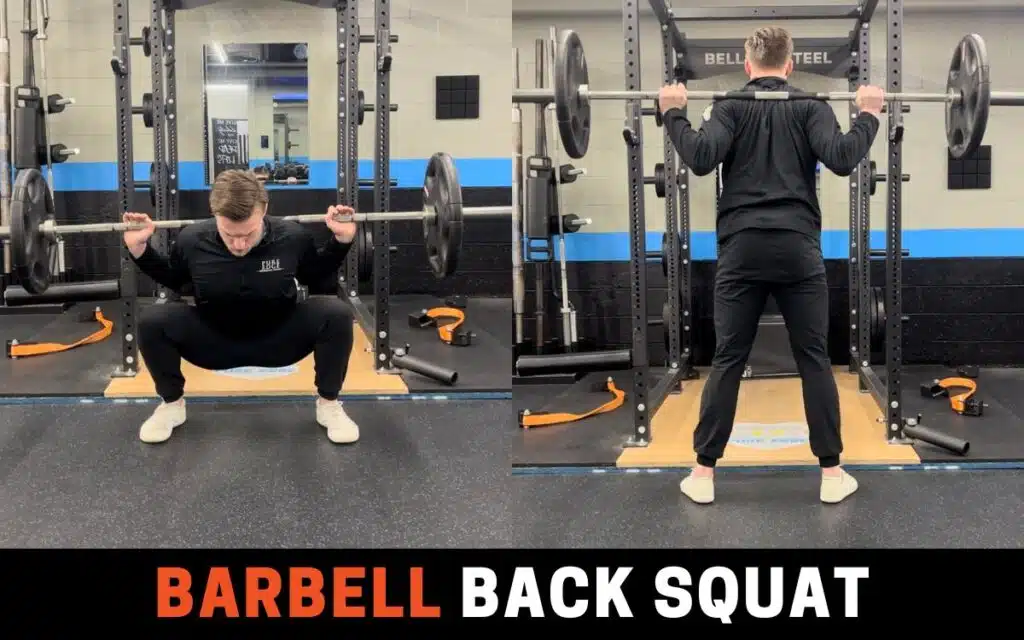
Now, you should be ready to complete a perfect barbell back squat. Back squats are one of the 3 major disciplines in powerlifting. This squat variation is posteriorly loaded (the bar sits on the lifter's back), which requires additional attention to core positioning.
- Using a rack, set the pins at a level that allows the barbell to rest at shoulder height
- Place hands at equal distances on the bar, and walk underneath the bar to place it on the upper traps or slightly lower if the low bar is the preferred positioning
- Unrack the bar by stacking the hips under the shoulders and standing up
- Step back and set the feet at hip width or slightly wider
- Initiate the squat by allowing the hips to travel backward as the knees track forwards
- Maintain a neutral spine by resisting back arching or rounding
- Once adequate depth is reached, maintain tension in the legs and push through the floor to initiate the ascent
- Keep the knees in line with the toes (do not let the knees cave inward), heels flat, and hips and shoulders rise at the same rate
- Finish the squat by returning the hips and knees to a stacked position under the shoulders
Wondering whether you should put the bar in a high bar or low bar position? Check out our article on Where You Should Put The Bar When Squatting
Common Mistakes When Progressing Your Squat
As you progress through squat variations to enhance your technique and strength, it's crucial to be aware of common mistakes that can hinder your development and increase the risk of injury. Here are the top five mistakes to watch out for:
- Neglecting Proper Warm-Up and Mobility Work: Skipping warm-up and mobility exercises can lead to poor form and reduced range of motion. A proper warm-up increases blood flow and prepares your muscles and joints for the squat movements, while mobility work is essential for achieving the correct depth and maintaining form.
- Rushing Progression: Advancing too quickly through squat variations without mastering the form of each can lead to technique breakdowns. Ensure you have fully developed the strength, stability, and mobility required at each stage before moving to more complex variations.
- Improper Weight Distribution: Placing too much weight on the toes or heels can lead to imbalance and inefficient force application. Focus on evenly distributing the weight across the entire foot to maintain stability and engage the correct muscle groups.
- Failing to Maintain a Neutral Spine: Allowing the lower back to round (lumbar flexion) or over-arching (hyperextension) can put unnecessary stress on the spine. Concentrate on engaging your core throughout the squat to support a neutral spine position.
- Overlooking Full Range of Motion: Performing partial squats without achieving full depth compromises muscle engagement and development. Aim for a depth where the hips drop below the knees, provided you can maintain form and do not have mobility restrictions.
By addressing these common mistakes, you can ensure a safer and more effective progression in your squat training, leading to better strength gains and overall squat performance.
Frequently Asked Questions
How Fast Should I Progress Squats?
Once you have mastered a squat variation by completing all reps and sets with proper form, do the same variation for the next week of training. This time, add 5-10 lbs. If you can do the same variation with perfect form at an increased load, you should be ready to advance to the next progression.
What Are the Benefits of More Advanced Squat Progressions?
Advanced squat progressions enhance strength by allowing heavier loads and are foundational for powerlifting. Unilateral variations improve stability, correct strength imbalances, and activate stabilizing muscles more than bilateral squats. One study found that unilateral exercises had greater muscle activation through the stabilizing muscles like the gluteus medius, compared to a two-leg squat.
Other Powerlifting Progressions
- 10 Bench Press Progressions From Beginner To Advanced
- 8 Deadlift Progressions From Beginner To Advanced
- 10 Overhead Squat Progressions From Beginner To Advanced
- 10 Pistol Squat Progressions From Beginner To Advanced
- 9 Bulgarian Split Squat Progression (From Basic to Advanced)
References
- McCurdy K, O’Kelley E, Kutz M, Langford G, Ernest J, Torres M. Comparison of Lower Extremity Emg between the 2-Leg Squat and Modified Single-Leg Squat in Female Athletes. Journal of Sport Rehabilitation. 2010 Feb;19(1):57–70.
About The Author

Avi Silverberg holds a Master of Science in Exercise Science with a research focus on powerlifting training. He's been the Head Coach for Team Canada Powerlifting since 2012 and has coached over 4500 attempts in international competition. You can connect with him on Instagram or LinkedIn.