

It’s no surprise that the pistol squat is one of the most difficult single-leg exercises to master.
This unilateral (single-leg) exercise requires the lifter to squat down until their hamstring makes contact with their calf and stand back up, while balancing on just a single leg.
Obviously, this exercise demands serious leg strength, overall stability, and joint mobility. Because of these requirements, it’s often completely avoided by lifters who actually have the potential to master it — provided they have a guide of progressions to help get them there.
Here are the 10 pistol squat progressions (from basic to advanced):
- Bodyweight Squat
- Split Squat
- Bulgarian Split Squat
- Single Leg Step Down
- Rocking Box Pistol Squat
- Strict Box Pistol Squat
- Ring-Assisted Pistol Squat
- Pole-Assisted Pistol Squat
- Elevated Pistol Squat
- Wushu Pistol Squat
In the article below, I’ll explain what you need to know to avoid getting injured with this advanced exercise. In addition, I’ll walk you through the 10 progressions to follow in order to get your first pistol squat in no time.
Let’s get started!
Looking for an alternative to the pistol squat? Here’s the 8 Best Pistol Squat Alternatives (With Pictures).
Table of Contents
What Makes a Good Exercise Regression for the Pistol Squat?
A good exercise regression for the pistol squat accomplishes one of the following: (1) it targets a weak range of motion, (2) it helps you practice a difficult part of the lift, or (3) it allows for a counterbalance effect.
Weak Range of Motion
Most lifters will be weaker in the middle portion of the pistol squat, as the quads fight hard to propel the lifter back up. Regressions that allow you to focus on building up your quad strength in a pistol squat specific manner will reign supreme over leg extensions and leg presses.
Additional Practice
Getting high quality practice in how to balance, coordinate and execute the pistol squat is key in performing the movement proficiently. Well-designed regressions will assist you in practicing the most difficult parts of the pistol squat without subjecting yourself to a significant injury risk.
Counterbalance Effect
Having to balance on one leg throughout the pistol squat can be a serious challenge. Loading more weight in front of you via a weight plate or set of dumbbells makes this requirement much easier — allowing you to focus on getting the basics down.
Interested in more squat progressions? Check out my article on the best back squat progressions to take you from beginner to advanced.
Before You Start Pistol Squatting
Prior to performing the pistol squat, it’s essential that you have a sufficient amount of mobility in your ankle joint and hip joint.
Many lifters are unable to pistol squat correctly, as they lack adequate ankle and hip mobility to enter deep ranges of motion while staying balanced. Further, a pistol squat necessitates a large amount of strength and asking so much of your muscles and joints in (potentially) compromised positions is looking for trouble.
Before you try the first progression listed in this article, make sure the following joints are mobile enough.
Ankle Mobility
Fact: The pistol squat requires significant ankle mobility.
To perform a correct pistol squat and avoid getting injured in the process, you must be able to make contact with your hamstring against your calf without letting your heel raise up off the floor.
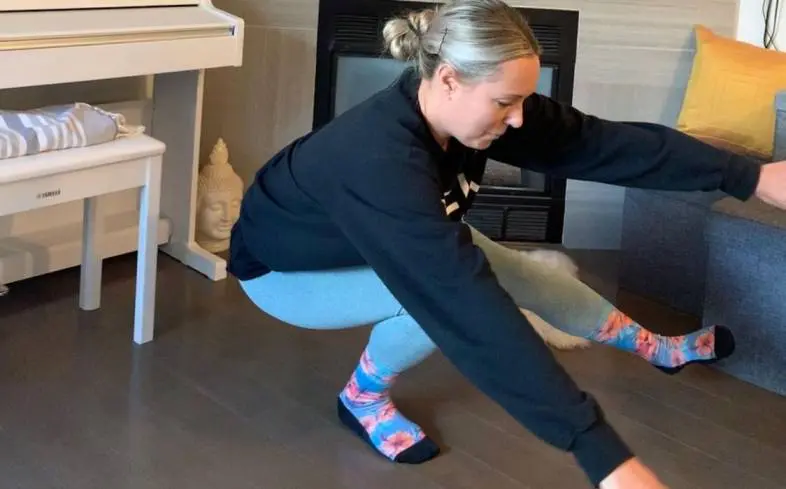
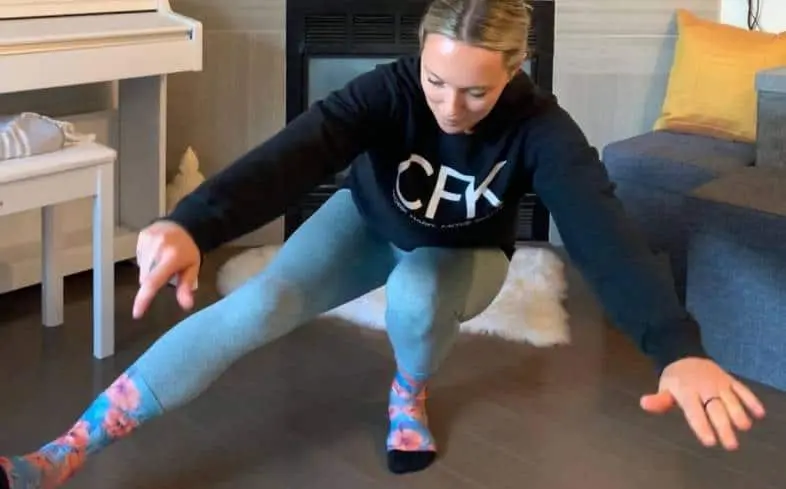
Mobility test: To ensure your ankles are mobile enough, you should be able to perform a deep squat hold with your knees pushed forward and out to ensure you’re getting enough ankle flexion. If you can do this, move onto the hip mobility section below.
Hip Mobility
Fact: The pistol squat also requires serious mobility in your hip joint.
To stay injury-free as you do full-range pistol squats, you must be mobile enough to lean forward significantly on a single leg while controlling your side-to-side movement.
Mobility test: To ensure your hips are sufficiently mobile for pistol squatting, you should be able to pull your knee up to your chest so that your thigh makes contact with your ribcage. If you can do this basic move, carry on to the first progression!
If pistol squats have been hurting your knees, then make sure to check out my article on Are Pistol Squats Bad For Your Knees where I explain what to do and how to avoid it in the first place.
10 Pistol Squat Exercise Progressions
Here are my top pistol squat progressions from basic to advanced!
1. Bodyweight Squat
The first progression to achieving a pistol squat is to be able to perform a bodyweight squat.
However, what we’re looking for here is the ability to sink deep into the bottom of the squat. In other words, the lifter should be able to squat deep enough for their hamstrings to make contact against their calves.
How to do it
- Start by standing tall
- Place your feet shoulder-width apart
- Point your toes outwards slightly
- Begin by bending at your knees and hips
- As you descend, allow your arms to hover in front of you
- Continue sitting your hips back and leaning progressively more forward
- Stop once your thighs are parallel to the floor or slightly lower
- Push through your feet to stand back up
Common Mistakes
- Staying too vertical. Trying to maintain a completely vertical torso is one of the most common mistakes with the bodyweight squat. Trying to stay too upright during your squat will likely make you fall backwards. Instead, keep your balance in your mid-foot by allowing your torso to lean forward as you squat down.
- Heels rising up. An inability to demonstrate adequate ankle mobility will leave you unable to progress to the next exercise — grinding your pistol squat progressions to a halt. If you’re struggling with immobile ankles and find your heels kick up when you try to squat deep, it could be due to any of the following: poor proprioception, lack of mobility, wearing the wrong shoes, or poor stance and foot position.
Find out how to fix your immobile ankles by checking out my article on How To Fix Heel Rising During Squat (7 Tips).
If you can squat down and make your hamstrings touch your calves without your heels rising, go ahead and progress to the next exercise!
2. Split Squat
The next progression to achieving a pistol squat is to be able to demonstrate a full-range split squat.
While the split squat doesn’t have a massive range of motion, performing a high-quality repetition shows a reasonable degree of unilateral (single-leg) leg strength — a critical component to achieving a pistol squat later on.
How to do it
- Start by standing tall
- With your non-dominant leg, take a large step forward
- With your back leg, only the ball of your foot should be on the floor
- Begin to descend by bending at your knees
- As you lower yourself, allow your arms to hover in front or at your sides
- Stop once your back knee makes contact against the ground
- Push through your feet to stand back up
- Repeat for the same reps on the other side
Common Mistakes
- Losing balance. Remaining stable during the split squat is an essential part of this exercise. If you find yourself struggling with not toppling over, try focusing your gaze on a spot on the floor a few paces in front of you. You’ll find your side-to-side balance feels stronger when your eyes are locked-in.
- Bouncing off the floor. Attempting to gather momentum by bouncing your back knee off the floor might help you complete a rep or set for now, but it only hampers your long-term progression. Too much momentum means your legs do less work than they should. Keep the work on your muscles by doing a soft touch to the floor instead of a hard bounce.
Bonus tip: To make this exercise a little gentler on your knees — and help you keep your reps consistent — place a thin mat or folded hand towel on the floor where your back knee will make contact. Your knees will thank you later.
If you can do a full-range split squat on both legs without losing your balance, you’re ready for the next progression!
3. Bulgarian Split Squat
The next progression to achieving a pistol squat is to show an even greater amount of leg strength and balance using the Bulgarian split squat.
Similar to the regular split squat, the Bulgarian version has the lifter’s back foot elevated. This change in foot position shifts more work onto the front leg.
How to do it
- Start by standing tall with a bench behind you and in contact with your legs
- With your non-dominant leg, take a large step forward
- Place the top of your back foot (the laces of your shoe) on the top of the bench
- Begin to descend by bending at your knees
- As you lower yourself, allow your arms to hover in front or at your sides
- Stop once your back knee makes contact against the ground
- Push through your front foot to stand back up
- Repeat for the same reps on the other side
Common Mistakes
- Cramping in your foot. Sometimes, lifters unconsciously flex their rear foot (the one that’s on the bench). If not given a chance to relax, the muscles of your feet can cramp when you’re mid-rep. Try your best to relax your back foot as you perform the exercise, or place the ball of your foot on the bench instead of the top of your shoe.
- Incorrect distance from bench. You’ll know when you’ve perfected the distance between the bench and your front foot when the exercise feels natural. Too close to the bench might have you making contact against it as you lower yourself. Too far away will limit your range of motion due to the extreme stretch on your inner thigh muscles. Once you perfect the distance, mark where your shoe sits to replicate the same distance every time.
If you can do a full-range Bulgarian split squat with both legs and without losing your balance, move onto the next progression!
4. Single Leg Step Down
The next step in progressing toward a pistol squat is to become proficient with the single leg step down.
In the single leg step down, the lifter becomes more accustomed to moving in more of a conventional squatting exercise by breaking free of the lunge-style from the two previous split squat variations.
How to do it
- Start by standing tall with a box next to you that’s roughly knee-high
- Side-step onto the box with the foot that’s closest to the box
- Stand tall with your opposite foot trailing off the side of the box (this is your starting position for each rep)
- When ready, begin bending at the knee and hip of your working leg
- Lower yourself slowly while keeping tension in your quad
- As you descend, continue leaning forward to keep your balance
- Once your non-working leg touches the floor, reset to the top position
- Repeat for the same reps on the other side
Common Mistakes
- Leading with the toes. While the emphasis on this exercise is the eccentric (downward) phase, your quads and glutes still contribute during the concentric (upward). A common mistake is to allow your foot to make contact with the floor like how you’d normally step down from a box, as this unconsciously allows the lifter to use their non-working leg to push off the floor — taking the emphasis on their working leg (the one that’s one the box). Instead of leading with your toes, lead with your heel and keep your non-working leg stiff throughout the exercise.
- Letting the foot hang partially off the box. This error isn’t exclusive to this exercise; in fact, it’s often seen with any movement that involves a step-up. Allowing your foot to hang off the box (even just the edge of your shoe places a greater likelihood of the box tipping over, potentially causing serious injury. Stay safe with the single-leg step down by keeping your entire foot firmly on top of the box at all times.
Typically, gyms have boxes that can be used for 3 heights depending on their orientation (usually have the following heights: 16”, 20” and 24”). If you want your own to use at home, here’s the most popular one on Amazon (click here to view today’s price) — there’s 4 different configurations to choose from.
Once you can do a controlled single-leg step down on both legs without having to push off the floor with your non-working leg, you should carry on to the next exercise!
5. Rocking Box Pistol Squat
With the rocking box pistol squat, this progression begins to branch into more specific pistol squat territory.
As you’ll see, the emphasis is still highly placed on one leg at a time and the lifter can progressively lower the height of the box over a series of workouts to make it more difficult.
How to do it
- Start by standing tall with a box roughly knee-high behind you
- Make sure your heels are only a couple inches from the box
- For your stance, plant the heel of your non-dominant foot in line with the toes of your dominant foot
- When ready, bend at your knee while pushing your hips back
- As you lower yourself, allow your arms to hover in front to keep your balance
- Sit gently on the box, then rock forward to build some momentum
- Immediately push your dominant foot into the floor to help you stand up
- Repeat for the same reps on the other side
Common Mistakes
- Inconsistent rocking. The whole point of the rocking box pistol squat is to continue strengthening your legs while developing proficiency with a more pistol squat-specific exercise. However, you need to do your best to standardize the amount of momentum you use to rock forward. If you only use a little momentum at the start of your set and incorporate lots toward the end of your set, it will be difficult to know when to progress to a more challenging variation.
- Always keeping your non-working foot planted. At some point, you’ll need to lift up the foot of your non-working leg to begin testing your balance and increase your unilateral leg strength even further. If keeping both feet on the floor doesn’t feel challenging enough for your working leg, lift up your opposite foot and keep it elevated throughout your set.
Bonus tip: to make this exercise a little gentler on your knees — and help you keep your reps consistent — place a thin mat or folded hand towel on the floor where your back knee will make contact on the floor. Your knees will thank you later.
If you can do the rocking box pistol squat on both sides with your non-working foot off the floor throughout the exercise, you’re ready for the next progression!
6. Strict Box Pistol Squat
The strict box pistol squat is similar to the rocking version mentioned previously, but with some notable differences.
First, it has the non-dominant foot elevated from start to finish. It also makes use of a pair of light dumbbells to help the lifter balance, and it allows for no momentum to kickstart the ascent.
How to do it
- Grab a pair of light dumbbells (10-15 lbs per hand)
- Start by standing tall with a box roughly knee-high behind you
- Make sure your heels are only a couple inches from the box
- Lift your non-dominant leg in front of you with a slight knee bend
- Raise the dumbbells to shoulder-height with straight arms
- When ready, bend at the knee with you dominant leg
- Sit gently on the box, then push your dominant foot into the floor to stand up
- Repeat for the same reps on the other side
Common Mistakes
- Not starting with a counterbalance. Many lifters will mistakenly jump right into performing this exercise without using dumbbells to provide a counterbalance. Don’t let its simplicity fool you — start with a couple dumbbells, then feel free to forgo the counterbalance later on.
- Too low of a box. Similar to the point above, some lifters overestimate their unilateral leg strength and use the lowest box they can find. Usually, they find themselves unable to stand up without serious momentum added to their ascent. Leave your ego at the door and start with a higher box — you can always lower it as you improve.
Bonus tip: You can still do this exercise at home, even if you don’t have any dumbbells. Simply fill a couple gallon-sized jugs with water to act as a counterbalance. Alternatively, a backpack filled with textbooks (or anything heavy) and held with both hands can also work!
When you can perform the strict box pistol squat with both legs, feel free to advance to the next movement!
7. Ring-Assisted Pistol Squat
The ring-assisted pistol squat allows the lifter to dabble with the full range of motion that occurs in the regular pistol squat, while permitting significant assistance from the arms to help the lifter stand up.
How to do it
- Find a set of gymnastic rings (or a TRX strap)
- Grab the rings with a neutral grip, ensuring they’re set about chest-high
- While standing tall, lift one leg in front of you with a straight knee
- When ready, begin bending at your knee
- As you descend, keep tension on the rings but allow your arms to gradually straighten
- As you approach the bottom position, continue keeping your non-working leg off the floor
- Once you reach the bottom position, push the floor away and pull yourself back up using your arms
- Repeat for the same reps on the other side
Common Mistakes
- Rings set incorrectly. The ideal length for the straps is when the rings are in line with your chest when you’re standing upright. In this position, your arms will be bent, but they should straighten completely when you’re in the bottom of your pistol squat. Setting the rings in this way will allow you to use your arms enough to make this a doable exercise.
- Foot too far forward. If you set the foot of your working leg too far forward, the rings will end up directly over your head in the bottom position instead of being slightly in front of you. Having the rings overhead will also not allow you to use your arms to help pull yourself up out of the bottom of your pistol squat — making the exercise too difficult for your legs.
If you can do the ring-assisted pistol squat with both legs, then move onto the next progression!
8. Pole-Assisted Pistol Squat
The pole-assisted pistol squat brings the lifter through the standard pistol squat’s entire range of motion with minimal support from the arms.
In this exercise, the lifter uses their arms to “walk” themselves down into the bottom pistol squat position to provide balance as their working leg pushes them back to the standing position.
How to do it
- Find a vertical pole (or the upright of a power rack)
- While standing tall, line up the vertical object with the middle of your body
- Ensure that you are a little less than arm’s length away it
- Grab the pole with both hands and lift your non-dominant foot off the floor
- When ready, begin bending at your knee as you “walk” your hands down the pole
- Keep your non-working leg off the floor as you continue to descend
- Once you reach the bottom pistol squat position, push the floor away and gently “climb” yourself back up using your arms
- Repeat for the same reps on the other side
Common Mistakes
- Using your arms too much. A key component of this exercise is that your arms should help you to balance, but they definitely shouldn’t be the main mover. When you get to the bottom of the pistol squat, focus hard on pushing the floor away to use your quads. As you stand up, allow your arms to gently assist when your ascending speed starts to slow down.
- Being too close to the pole. If the pole or upright is too close to your body, you’ll feel cramped and might actually be encouraged to use your arms more than you should. Ideally, you should be about arms length away from the pole which will lessen your ability to use your arms and shift the focus primarily onto your legs.
Once you can complete the pole-assisted pistol squat with both legs while using your arms minimally, carry on to the next progression!
9. Elevated Pistol Squat
In the elevated pistol squat, the lifter stands on a box as they perform the exercise — allowing them to complete the movement without needing as much hip mobility and strength in their non-working leg.
This exercise also eliminates the support from gymnastics rings or a pole, and forces the lifter to maintain sole control of their balance.
How to do it
- Start by standing tall on a box next to you that’s roughly knee-high
- Lift your outside foot and allow it to hang off the side of the box (this is your starting position for each rep)
- When ready, begin bending at the knee and hip of your working leg
- Lower slowly while keeping tension in your quad and leaning forward to keep your balance
- Avoid touching your non-working leg to the floor by lifting it as you lower yourself
- Push your foot into the box to stand up
- Repeat for the same reps on the other side
Common Mistakes
- Non-working leg touching the floor. It’s common for lifters to keep their non-working leg hanging directly under them as they first perform this exercise, allowing the foot of their non-working leg to assist out of the bottom. Obviously, you should catch yourself if you start to fall by placing your non-working leg on the floor to regain your balance. However, the intention of this exercise is to keep the foot of your non-working leg high enough that it does not make contact with the floor throughout the exercise.
- Losing balance repeatedly. If you find yourself unable to maintain your balance in the bottom position at all, you might need a small counterbalance for the first couple weeks. In this case, hold a 2.5-5 pound dumbbell (or weight plate) in each hand and keep them raised with straight arms at shoulder-height as you descend. As you get better with your balance and unilateral strength, reduce the weight until you’re performing elevated pistol squats with your bodyweight only.
Not interested in the pistol squat after all? You might like the shrimp squat instead, check out the differences between the two in my article Pistol Squat vs Shrimp Squat.
If you can do a full-range elevated pistol squat on both legs without touching the floor, you’re ready for the last progression!
10. Wushu Pistol Squat
The wushu pistol squat requires the lifter to grab and hold the foot of their non-working leg to lessen the strength demand of keeping that leg off the floor in the bottom of their pistol squat.
Further, the height at which the leg is held provides a slight counterbalance to make it easier for the lifter to stay balanced.
How to do it
- Start by standing tall
- Lift your non-dominant leg up in front of you with a straight knee
- Grab your foot and hold it throughout the exercise
- When ready, begin bending at the knee and hip of your working leg
- Lower slowly while keeping a firm grasp on your non-working foot
- Once you reach your bottom position, push the floor away to stand up
- Repeat for the same reps on the other side
Common Mistakes
- Not able to grab your foot. Whether it’s due to body structure or a lack of flexibility, some lifters will simply not be able to grab their foot to perform this exercise. Alternatively, you can forgo the foot grab and simply hold two light dumbbells (5-10 lbs in each hand) to allow you a small counterbalance — make sure to still keep your non-working leg off the floor throughout the exercise!
If you can do a full-range wushu pistol squat on both legs without touching the floor with your working leg, then congratulations… you’re qualified to do a regular pistol squat!
Final Thoughts
Following the progressions listed above will almost certainly lead you to completing your first pistol squat.
For lifters who are new to single-leg bodyweight exercises, expect a few weeks of solid practice and progressing through the exercises before you can achieve a regular pistol squat.
For lifters who are routinely performing unilateral calisthenics and/or have serious unilateral leg strength, you’ll be able to monitor yourself as you move from progression to progression — possibly landing your first pistol squat in your first workout.
All things considered, remember to be conservative with the exercises listed above by not performing a massive amount of reps in your first few workouts. Always be diligent with a technically-demanding exercise like this, and you’ll be hitting your first pistol squat in no time!
Pistol squats can make the quads sorer than other squatting variations. Check out my article on Quads Sore After Squats: Is This Good Or Bad?
Other Squat Resources
- Can’t Balance Doing Pistol Squats? (Try These 6 Tips)
- Isometric Pistol Squat: What Is It, Benefits, How-To
- 10 Overhead Squat Progressions: From Beginner To Advanced
- 9 Bulgarian Split Squat Progression (From Basic to Advanced)