


Here is the best pull day workout plan I would use with my current clients:
- Straight Arm Lat Pulldowns: 3 sets x 20 reps at RPE7
- Pendlay Rows: 5 sets x 8 reps
- Seal Rows: 2 sets x 10 reps
- Pull Ups: 3 sets x FAILURE
- Shrugs: 3 sets x 20 reps
- Bicep Curls: 5 sets x 12 reps
These are only half of the 12 great exercises to consider when creating a full pull day workout.
Through my experience as a strength and conditioning coach, I’ve built many programs and understand the importance of a strong pull day workout. This article will discuss a series of movements, their benefits, and how to perform them. We will even build a workout to increase size and strength or be an outright beginner.
Don’t miss as I share the details of all these movements so you are prepared to create your own successful pull day workout and know what to do on a pull day!
Want to learn about more pull day exercises for your chest or back? Check out this article about the top upper body pull day exercises you can perform!
Best Pull Day Workouts for Strength, Size, & Beginners
For a good pull day workout, I recommend 5-6 exercises with 3-5 sets and 6-20 reps for each exercise. Below, I’ll show you exactly what to do depending on your goals for strength, size, and beginners.
But to ensure balance, you must include a few exercises in each workout, including a vertical row, a horizontal row, and a bicep curl variation. This helps to prevent injury and muscle imbalances.
Below are the best pull day workouts for strength and size, and there’s one for beginners:
Pull Day Workout for Strength
- Straight Arm Lat Pulldowns: 3 sets x 20 reps at RPE7
- Pendlay Rows: 5 sets x 8 reps
- Pull Ups: 3 sets x FAILURE
- Seal Rows: 2 sets x 10 reps
- Shrugs: 3 sets x 20 reps
- Bicep Curls: 5 sets x 12 reps
Pull Day Workout for Size
- Lat Pulldowns: 3 sets x 10 reps
- Straight-Arm Lat Pulldowns: 2 sets x 12 reps
- Bent Rows: 3 sets x 12 reps
- Bent-over Dumbbell Flies: 3 sets x 15 reps
- Shrugs: 3 sets x 20 reps
- Biceps Curls: 5 sets x 15 reps
Pull Day Workout for Beginners
- Seated Cable Rows: 3 sets x 10 reps
- Lat Pulldowns: 3 sets x 12 reps
- Inverted Rows: 2 sets x FAILURE
- Single-Arm Dumbbell Rows: 3 sets x 10 reps
- Bicep Curls: 5 sets x 12 reps
Besides pull day, you need to focus on push day too! Check out this article about the best push day workouts to do to grow that upper body!
Muscles Used in Pull Day

The muscles used to perform a pull day workout are:
- Lats: The latissimus dorsi, or lats, are large muscles in the back responsible for shoulder extension and adduction.
- Traps: The trapezius muscles, or traps, are upper back muscles that support shoulder movement and neck stability.
- Rhomboids: Rhomboids are muscles between the shoulder blades, aiding in scapular retraction and elevation.
- Erectors: The erector spinae are muscles that support the lower spine and help you maintain a stronger core. They are typically referred to as your lower back muscles.
- Rear Deltoids: The rear deltoids are part of the shoulder muscles, contributing to shoulder joint pulling movements.
- Biceps: The biceps brachii, or biceps, are muscles in the upper arm responsible for elbow flexion during pulling movement.
Is the deadlift a push or pull exercise? Read the full post.
12 Best Pull Day Exercises To Add To Your Workout
Knowing about each exercise will help you hand-pick the right pulling exercises to add to your workout. Here are the 12 best pull day exercises:
- Straight Arm Lat Pulldowns
- Pendlay Rows
- Pull Ups
- Seal Rows
- Shrugs
- Bicep Curls
- Lat Pulldowns
- Bent Row
- Bent-Over Dumbbell Flies
- Seated Cable Rows
- Inverted Rows
- Single-Arm Dumbbell Rows
Not sure how to choose between a bro split and a push, pull, and legs routine? Check out this article that discusses the bro split vs a ppl split and the pros and cons of each.
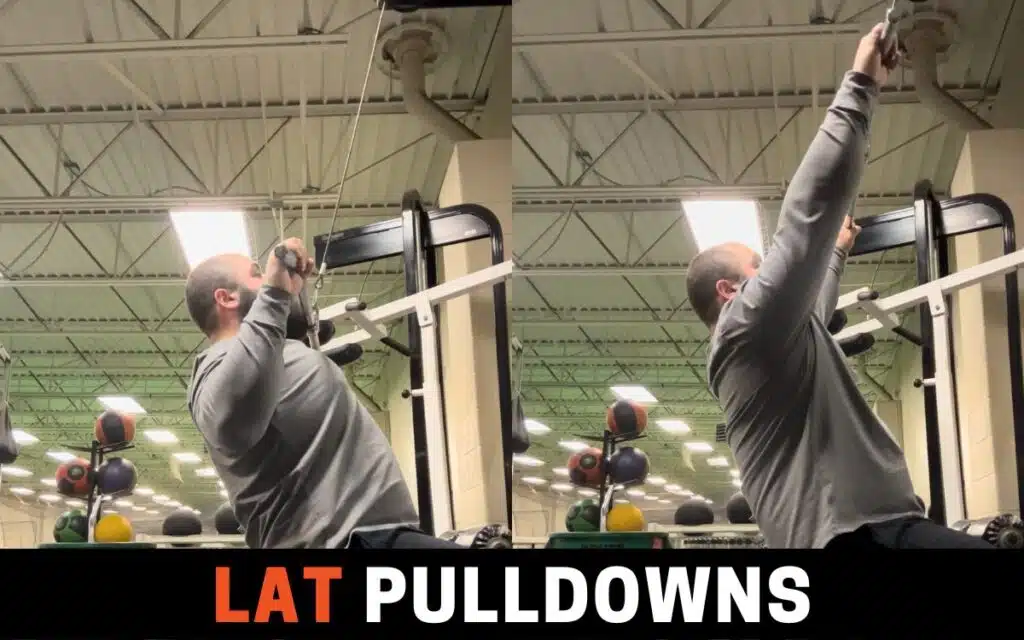
1. Straight-Arm Lat Pulldowns
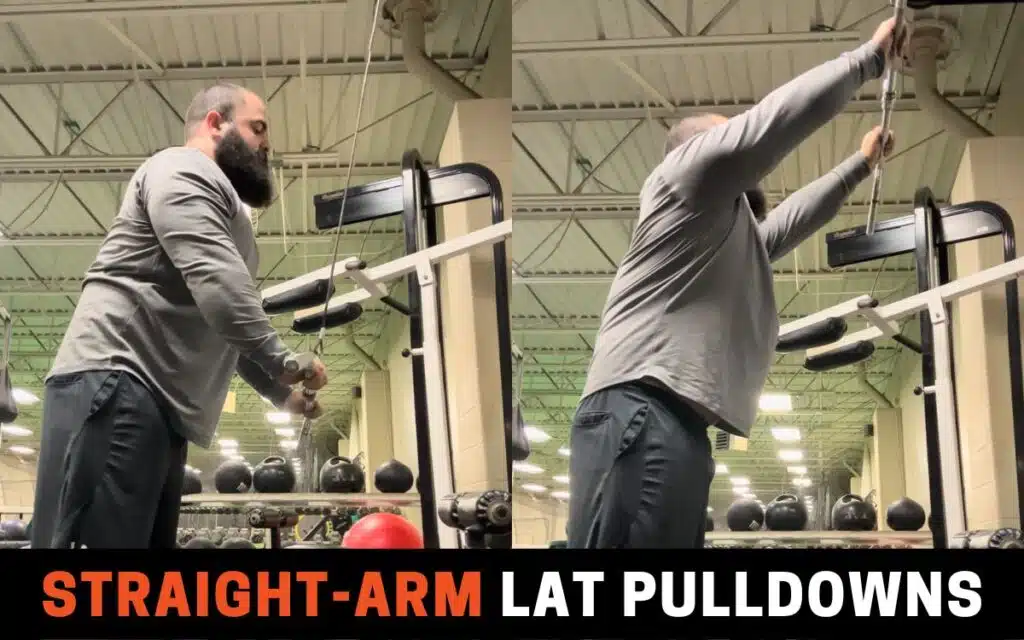
The straight-arm lat pulldown is a single-joint exercise that helps work your back, arm, and shoulders. But as the name suggests, it specifically works your lats. I think it’s a great pull day exercise as it trains one of the most dominant pulling muscles of the body.
How To
- Facing the cable, place your hands on top of the bar at shoulder width or slightly wider with palms facing down.
- Facing the cable, place your hands on top of the bar at shoulder width or slightly wider.
- You can stand straight up and down or bend slightly forward at the hips (this will be more necessary as you increase load).
- Keeping your elbows straight, pull or swing the cable down to your hips until it touches your legs.
- Keeping your elbows straight, return the bar to the top position.
- Repeat for reps.
Mistakes To Avoid
Many of my clients will perform this movement while standing completely upright. When you set up for the straight-arm lat pulldown, bend at the waist and hinge forward to help get a bigger stretch of the lat muscle and take the tension out of your core.
If you want other lat pulldown alternatives, check out the full post.
2. Pendlay Rows
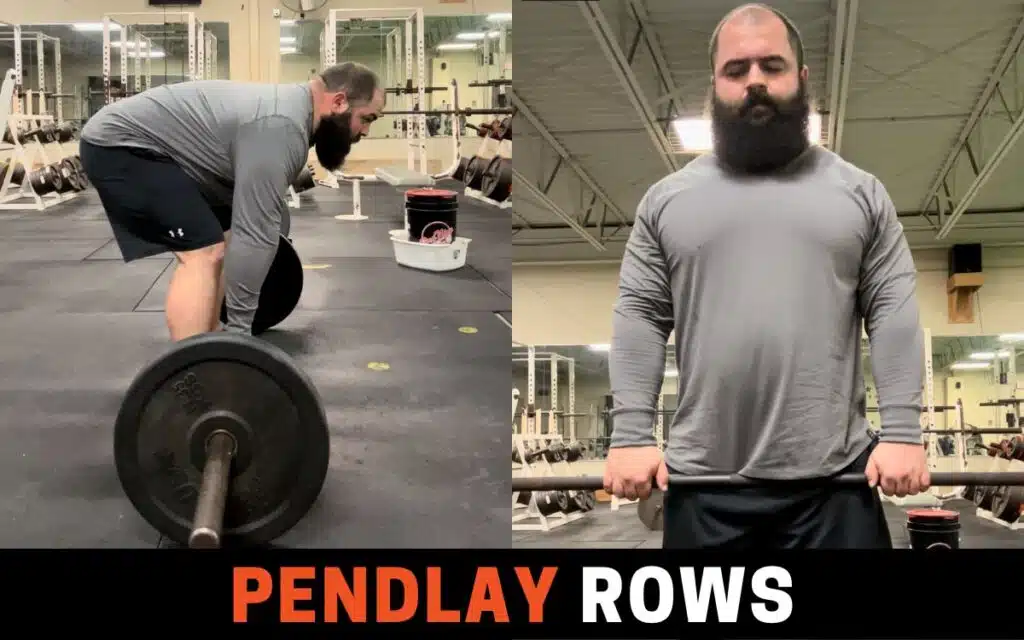
A Pendlay row is similar to the barbell row but calls for explosive, fast reps instead of steady, controlled reps. It’s used to develop explosive strength in powerlifters, Olympic weightlifters, and other athletes looking to improve their back strength.
How To
- Step up to a barbell on the floor with your feet slightly narrower than shoulder-width apart.
- Bend 90 degrees at the hip so your torso is parallel or close to parallel with the floor.
- Grip the barbell about shoulder-width apart or slightly wider. Your grip should be similar to your bench press grip.
- With the bar resting on the floor from the start, set your back position and tense all your muscles to perform a fast, explosive rep off the floor.
- Rowing the bar to your chest, about the same touch point as when you bench press.
- Return the bar to the floor so your muscles can relax entirely before repeating.
- Repeat for reps.
Mistakes To Avoid
Many people struggle with the bottom position of the Pendlay row. They begin to round their back into each rep. If that's the case, do Pendlay rows off the blocks so you start off with a higher posture.
If you want similar exercises to the Pendlay row, check out the 11 alternatives to consider instead.
3. Pull-Ups

Pull-ups, often overlooked, are excellent pull exercises, especially for powerlifters. Despite their difficulty, starting with variations or assistance is worth the benefits they bring to your pull day routine. They provide vertical resistance to help with scapular depression and elevation.
A warmup is needed for pull-ups to make sure your body is ready to use proper form and mechanics.
How To
- Grip an overhead bar with your hands about shoulder-width apart.
- Pull your body up to the bar so your head extends above the bar.
- Lower yourself back down.
- Repeat for reps.
Mistakes To Avoid
You may need some help getting strong enough to perform your first pull-up, so use accommodating resistance-like bands to help improve your ability.
If you’re not sold on pull-ups, check out 14 alternatives to improve your back and biceps.
4. Seal Row

The seal row is commonly called the ultimate horizontal row because it’s perfectly stabilized. In this exercise, your chest is flat against a bench and parallel to the floor. It’s great because it eliminates help from your chest and legs, so your back does all the work.
A custom barbell designed to accommodate the bench underneath you will allow for a full range of motion. You can also use dumbbells as well.
How To
- Lie flat on a bench face down with a barbell or dumbbells underneath.
- Ensure the bench is high enough that your arms can fully extend without the barbell or dumbbells resting fully on the floor.
- Grip the barbell or dumbbells in your hands. If using a barbell, keep your hands about shoulder-width apart.
- Row the weights to your chest, about the same touch point as when you bench press.
- Lower the weights until your arms are fully extended.
- Repeat for reps.
Mistakes To Avoid
The seal row provides a great benefit if you pull back as far as possible. Some individuals treat this like a normal row. When you do this exercise, pull as far back as possible so that your chest starts to arch and your chin comes off the bench.
5. Shrugs
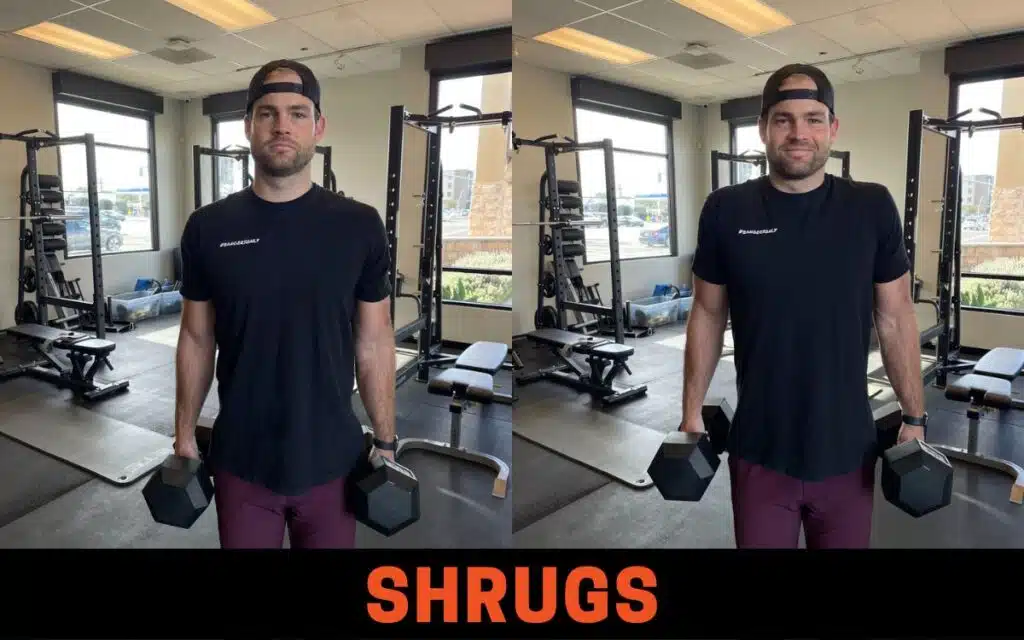
Shrugs are a great inclusion in a pull day workout to isolate those traps! They provide vertical resistance to challenge the upper back more than any other exercise.
How To
- Hold a dumbbell in each hand as you stand upright.
- Moving only your shoulders, shrug your arms up toward your ears as high as possible.
- Lower the dumbbells back down.
- Repeat for reps.
Mistakes To Avoid
When you do the shrug, don’t bob your head! People will believe they are performing reps each time their head pushes forward. However, the goal is to get tremendous scapular elevation and retraction. Lower the weight, and focus on the direction of your shoulders each rep.
You can also use a barbell to do shrugs, so read the full post to see which is best for you. Do shrugs help your deadlifts? Check out the full post.
6. Bicep Curls
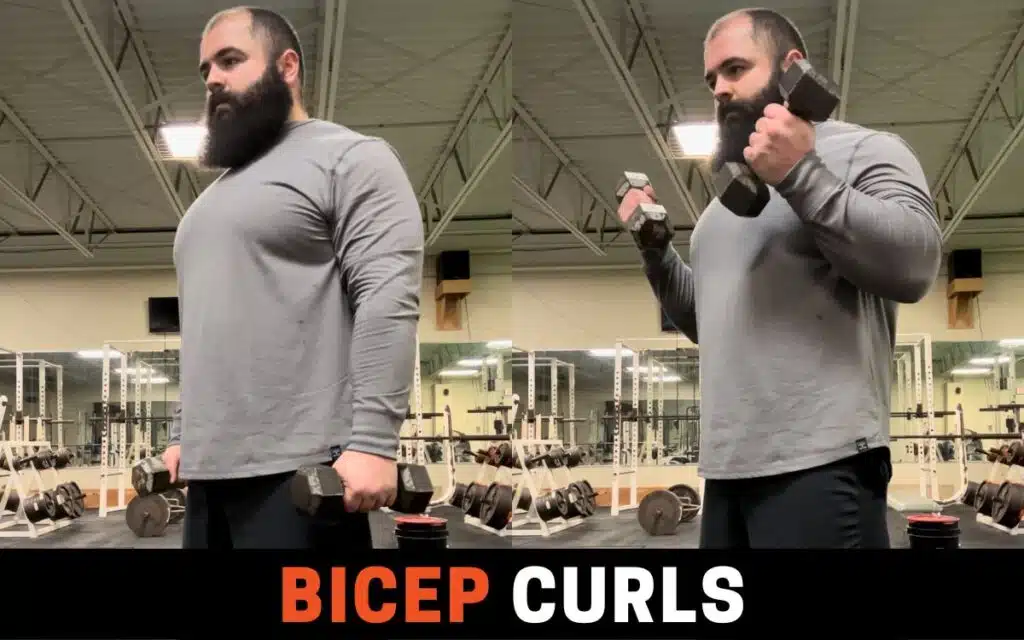
Bicep curls and all their variations are a key element to the best pull day workouts. They make it a pull day and not just a back day!
How To
- Hold a dumbbell or barbell in your hands.
- Standing or sitting upright, bend your arm at the elbow, curling the weight upward until you can’t bend your elbow anymore.
- Lower the weight back down.
- Repeat for reps.
Mistakes To Avoid
This is an isolated exercise, which means you want your biceps to work alone. All of the strain should stay in your biceps. So take your ego out of it, lower the weight, and do these effectively.
When doing bicep curls, check out this post to know whether you should do your reps fast or slow. Or here are some compound bicep exercises, if you’re looking for more arm strength.
7. Lat Pulldowns
Lat pulldowns are another one of the best pull workout exercises. They imitate the same movement pattern as a pull-up, but you can alter intensity for ease. They help with scapular depression and elevation.
How To
- Sit on a lat pulldown machine.
- Set the weight pin to the desired load.
- Grip the lat pulldown bar overhead.
- Secure your knees under the pad.
- Pull the bar to touch the top of your chest while staying upright.
- Return the bar back until your arms are fully extended.
- Repeat for reps.
Mistakes To Avoid
A common flaw is leaning the torso back during the pull, which hinders lat development. Start off lighter and build up strength to maximize optimal technique.
You can also vary your grip with a close or wide grip, so check out that post to see which is better.
8. Bent Row
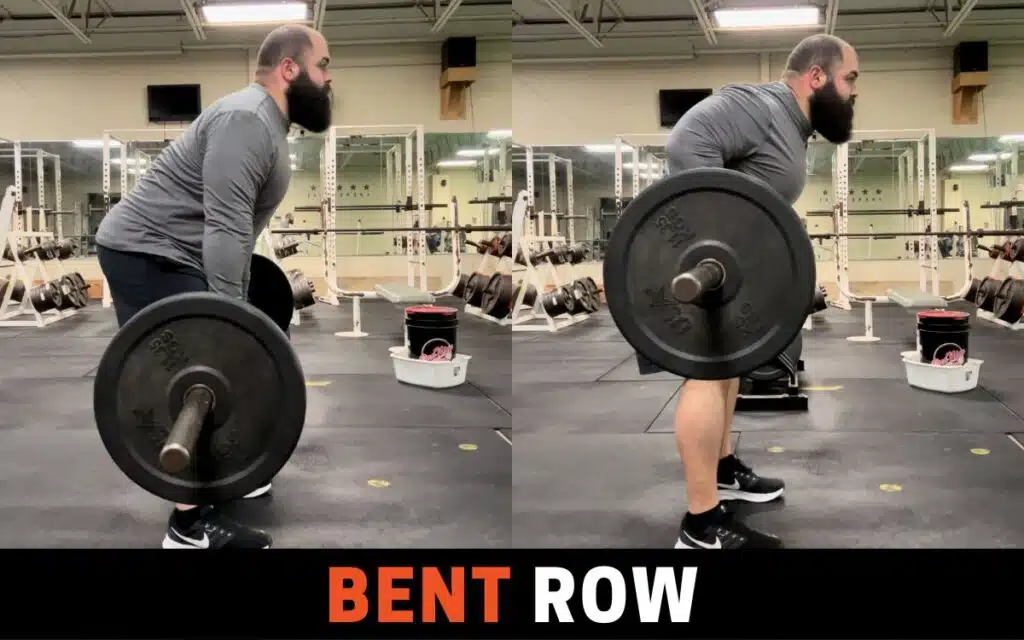
While they aren’t as stable as sitting down and putting your feet on a footplate, many people consider bent rows as one of the best pull day exercises. This movement is a horizontal exercise that recruits the lats, traps, and erectors, as you have to maintain a rigid core throughout the movement.
How To
- Step up to a barbell on the floor with your feet slightly narrower than shoulder-width apart.
- Bend 90 degrees at the hip, so your torso is parallel or close to parallel with the floor.
- Grip the barbell about shoulder-width apart or slightly wider. Overhand or underhand grips are both appropriate options (an underhand grip will work your biceps more).
- If using an overhand grip, row the barbell to the bottom of your rib cage and back down.
- If using an underhand grip, row the barbell to your belly button and back down.
- Repeat for reps. Don’t let the weight touch the floor in between each rep.
Mistakes to Avoid
One of the biggest flaws of the bent row is that people row with a higher touch point. Make sure that when you do the bent row, you pull towards your belly button and stay slightly upright to recruit the right pulling muscles for success.
Want other top dumbbell lat exercises? Check out the full post.
9. Bent-Over Dumbbell Flies

The bent-over dumbbell flies are one of the best exercises to recruit the rear deltoids, which are secondary muscles that assist with pulling exercises. They are crucial to a successful pull day and should be performed for shoulder health.
How To
- Hold a dumbbell in each hand.
- Bend 90 degrees at the waist so your chest is parallel to the floor or close to it. You can also do these against a bench for a chest-supported variation.
- Without bending your elbows, extend your arms straight out to the sides until your shoulder blades are as close together as you can stretch them.
- Return to the starting position.
- Repeat for reps.
Mistakes To Avoid
If you aren’t careful, you might start doing the bent over dumbbell flies as a row. You do not want to bend at the elbow actively during each rep. Ensure you have a slight bend at the elbow, and maintain it from start to finish.
Ever wondered how powerlifters train their back? Check out 3 other must-try workouts.
10. Seated Cable Rows

The seated cable row is a great horizontal row for your pull workout. Having your feet anchored against the footplate while you sit on a bench allows you to really isolate your back and rear shoulder muscles so they can do the work without sacrificing balance or stability.
How To
- Set the pin on the weight stack to the desired weight.
- Select and attach your preferred grip attachment.
- Sit on a cable row bench with your feet on the footplate.
- Set your knees in a locked position (they can be bent; just keep them in the same place).
- Set your upper body upright and avoid leaning forward or backward during the rep.
- Pull the cable attachment into your chest.
- Extend your arms back to the starting position.
- Repeat for reps.
Mistakes To Avoid
Make your back and arms do all the work! If you lean your torso forward and backward or push through your knees and change their position, you’ll get help from momentum and other muscles that aren’t intended to be used.
Looking to integrate more cable exercises into your workout? Check out more cable row exercises to help improve your next pull day!
11. Inverted Rows

The inverted row is a bodyweight exercise that provides a horizontal form of resistance similar to the other rows you see on this list. This is a great exercise for those lacking equipment and needing to challenge their traps, lats, and rhomboid muscles.
How To
- Lie under a secured barbell that is within your reach but high enough to fully extend your arms without your back resting on the floor or a bench below you.
- Grip the bar as you would with a bench press, about shoulder-width apart.
- Row your upper body up to the barbell until it touches your chest.
- Return to the starting position.
- Repeat for reps.
Common Mistakes To Avoid
The inverted row might sound simple, but it can be very challenging, especially for some body types. You can adjust the load of your inverted row similarly to how you make push-ups easier or harder—with your foot placement! Make sure to change foot placement or bend at the knees to avoid too much overload.
There are plenty of inverted row alternatives to consider, check the full post.
12. Single-Arm Dumbbell Rows

The single-arm dumbbell row is a great addition to a pull day workout as it puts all resistance on one arm at a time. Sometimes, we can rely on opposing limbs to generate movement throughout the exercise.
Using unilateral movements in any program helps increase muscular recruitment and builds more size and strength with the pulling muscles.
How To
- Kneel on a flat bench with one leg and keep the other foot planted on the floor next to the bench.
- Grab a dumbbell with the hand opposite your kneeling leg.
- Set your back parallel to the floor and brace your position with your empty hand on the bench.
- Row the dumbbell to the side of your torso, ideally to your hip.
- Return the dumbbell downward until your arm is fully extended.
- Repeat for reps.
Mistakes To Avoid
Many people tend to perform this exercise too explosively. The goal of this movement is to help build strength and size. Take each rep slowly, and pull back as far as you can to maximize muscular recruitment and fatigue.
FAQ
What Are The Benefits of a Pull Day Workout?
The benefits of a pull day workout are that it trains key muscle groups, can be applied to several goals and it's a big part of a larger training split. The back serves a vital role in our posture as well as supporting heavier loads with our pressing movements.
What Order Should I Do Pull Day Exercises?
For pull day workouts at the gym, the best order should be compound movements first, as they require the most energy and focus for success. Afterward, start to move into isolation exercises that help fatigue specific muscles for targeted growth.
How Many Exercises Should You Include on Pull Day?
As with any workout, a pull day should consist of 3-6 unique exercises, each done for 3-5 sets of 5-16 reps. Exercises should cover vertical pulls like pull-ups, horizontal pulls like seat cable rows, and bicep exercises like preacher curls.
Are Biceps Pull or Push?
The biceps are a pull muscle because they assist the back muscles in pulling weight toward your body or pulling your body toward an object. For this reason, the best pull workouts should always include bicep exercises.
How Do You Structure a Pull Day?
Typical pull days include 3-6 back and biceps exercises. Start with the heaviest, most intense lift, and progress to lighter loads with each subsequent exercise until you end with isolation exercises, like biceps curls or trap shrugs. This ensures that maximal energy is spent early on the most technical, difficult lifts.
References
1. Kim D, Cho M, Park Y, Yang Y. Effect of an exercise program for posture correction on musculoskeletal pain. Journal of Physical Therapy Science [Internet]. 2015;27(6):1791–4. Available from: https://www.ncbi.nlm.nih.gov/pmc/articles/PMC4499985/
2. Hewit JK. A Comparison of Muscle Activation during the Pull-up and Three Alternative Pulling Exercises. Journal of Physical Fitness, Medicine & Treatment in Sports [Internet]. 2018 Nov 2;5(4). Available from: https://juniperpublishers.com/jpfmts/pdf/JPFMTS.MS.ID.555669.pdf
About The Author

Adam Gardner is a proud resident of Utah, where he lives with his wife and two kids. He has been competing in powerlifting since 2016 in both the USPA and the APF. For the past three years, he and his wife, Merrili, have coached beginning lifters to learn the fundamentals of powerlifting and compete in their first powerlifting competitions.