
Here is the best push day workout I would use with many of my athletes:
- Bench Press: 2 sets x 6 reps with 76% of your 1RM
- Pause Bench Press: 3 sets x 3 reps with 60% of your 1RM
- JM Press: 3 sets x 8 reps
- Dips: 5 sets x 10 reps
- Seated Dumbbell Overhead Press: 3 sets x 12 reps
But there are 14 great exercises to consider adding to your push day, whether you’re a beginner or looking for strength or size.
I've drawn on my experience as a strength coach to add exercises with various forms of resistance (barbell, dumbbell, and bodyweight) to recruit your muscles differently for a better workout.
Don’t miss it as I share how to do each exercise properly and build the right push day workout for your goals.
Best Push Day Workouts for Strength, Size, & Beginners

For the best push day routine, you must use various forms of resistance, such as barbells, dumbbells, and bodyweight. You’ll also incorporate exercises that target multiple muscles (compound) and those that target one muscle (isolation) at a time.
- Compound movements target multiple muscle groups, which means you will recruit more muscles and overload those muscles to help trigger growth.
- Isolation movements can be used after compound exercises are finished. They are great for helping you target specific muscle groups and focus on engaging them for more growth.
Below are three sample push workout routines for strength, size, and beginners!
Push Day Workout for Strength
- Bench Press: 2 sets x 6 reps with 76% of your 1RM
- Pause Bench Press: 3 sets x 3 reps with 60% of your 1RM
- JM Press: 3 sets x 8 reps
- Dips: 5 sets x 10 reps
- Seated Dumbbell Overhead Press: 3 sets x 12 reps
Push Day Workout for Size
- Dumbbell Bench Press: 5 sets x 8 reps at RPE8
- Eccentric Bench Press: 3 sets x 6 reps
- Dumbbell Overhead Press: 3 sets x 10 reps
- Dumbbell French Press: 3 sets x 15 reps
- Cable Tricep Pushdown: 3 sets x (2 x 20 reps, 1x AMRAP)
Push Day Workout for Beginners
- Bench Press: 3 sets x 10 reps at 68% of 1RM
- Close Grip Bench Press: 2 sets x 12 reps
- Overhead Press: 3 sets x 10 reps
- Low Pulley Overhead Cable Tricep Extensions: 3×15
- Push Ups: 3 sets to FAILURE
How can you build your own push day workout?
I love how simple push day workouts are and that I only have to focus on one movement: pushing the weight. Yet, I can leave knowing I trained 3 key muscles: pecs, triceps, and shoulders. To start, I would choose 3-4 compound exercises and focus on them for a few weeks. Then, swap in some new exercises. Rinse and repeat.
Adam Gardner has been competing in powerlifting since 2016 in the USPA and the APF.
Looking for a great workout to complement your push day? Check out this article about the best pull day workout for improving performance!
14 Most Effective Push Day Exercises
- Bench Press
- Pause Bench Press
- JM Press
- Dips
- Seated Dumbbell Overhead Press
- Dumbbell Bench Press
- Eccentric Bench Press
- Dumbbell Overhead Press
- Cable Tricep Pushdown
- Low Pulley Cable Tricep Extension Overhead
- Close Grip Bench Press
- Overhead Press
- Dumbbell French Press
- Push Ups
1. Bench Press
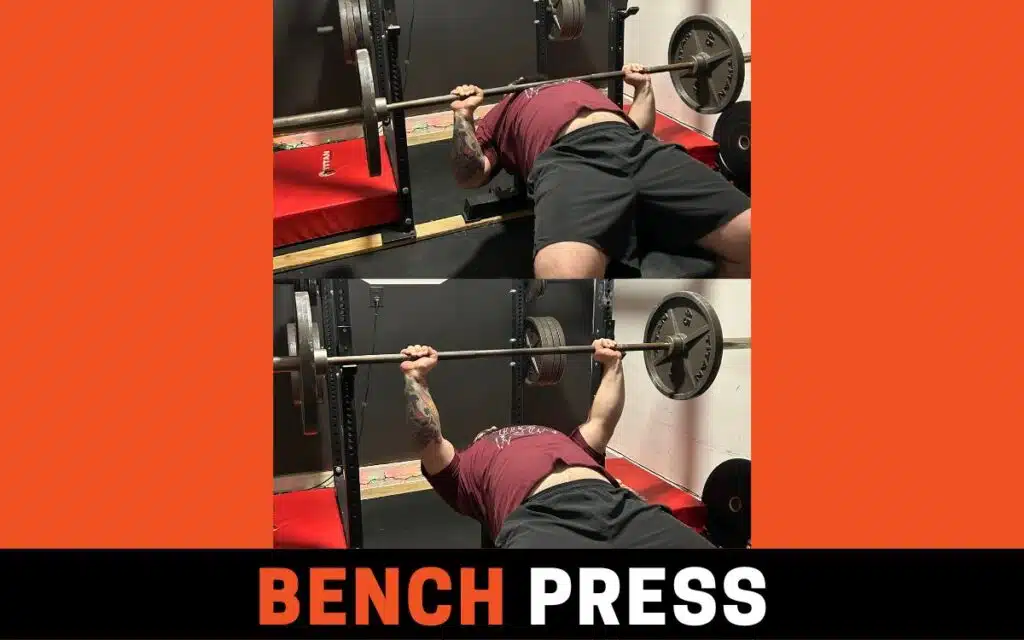
You can’t beat the classic bench press because it’s the ultimate push exercise. With your body securely placed against the bench, this exercise will allow you to move more weight than any other pressing exercise for maximum strength gains.
How To Do It
- Lie on a bench press with your feet firmly on the ground.
- Grip the barbell with your hands about shoulder-width apart.
- Unrack the barbell and pull it in front so it sits directly over your shoulder joint when your arms are extended.
- Lower the bar to your chest by pulling it to your rib cage, about to the bottom of your pecs.
- Press the bar upward to the resting point over your shoulder joint.
- Repeat for reps.
Common Mistakes to Avoid: The bench press also has a pulling element in lowering the bar to your chest. The biggest mistake I see in new lifters is that they don’t pull the bar down – they let the bar lower itself. Don’t let gravity lower the bar to your chest. Control it and pull it!
2. Paused Bench Press

The pause bench press is a variation that requires the athlete to pause the weight on their chest each rep. This helps you learn more about stabilizing and controlling your bench press reps. This variation helps to overload the chest at the bottom of the movement, which could also stimulate growth.
How To Do It
- Lie on a bench press with your feet firmly on the ground.
- Grip the barbell overhand with your hands about shoulder-width apart.
- Unrack the barbell and pull it in front so it sits directly over your shoulder joint when your arms are extended.
- Lower the bar to your chest by pulling it to your rib cage, about to the bottom of your pecs.
- With all your muscles tense and fully engaged (not relaxed), hold the bar on your touchpoint on your chest for 1-5 seconds.
- Press the bar upward to the resting point over your shoulder joint.
- Repeat for reps.
Common Mistakes to Avoid: The paused bench press does not mean resting the bar on our chest during the pause. We don’t want to disengage our muscles when the barbell hits our chest. Deliberately pause the bench press by holding it firmly on your chest with your pecs, shoulders, triceps, back, and core engaged fully.
3. JM Press

The JM press, created by lifter JM Blakley, is a tricep-dominant movement that has the lifter doing a creative exercise that looks like a close grip bench press and skull crusher combined. The JM press is a helpful movement that can improve tricep strength in a pressing motion similar to the bench press. This is a key lift for many strength athletes.
How To Do It
- Lie on a bench press with your feet firmly on the ground.
- Grip the barbell with your bench press grip or slightly narrower.
- Unrack the barbell and place it slightly upward towards the shoulders.
- Lower the bar to your chin, slightly above. It needs to be pressing, so don’t allow your elbow joint to dominate the movement.
- Press the bar upward, creating movement from the shoulder joint and elbow joint.
- Repeat for reps.
Common Mistakes to Avoid: This is a pressing movement. Do not make it like a skull crusher, an isolation movement. Press the weight and bring the bar towards the chin or slightly above each rep. This will put more pressure on the elbow joint to execute each rep, getting more recruitment of the triceps instead of the pecs.
4. Dips
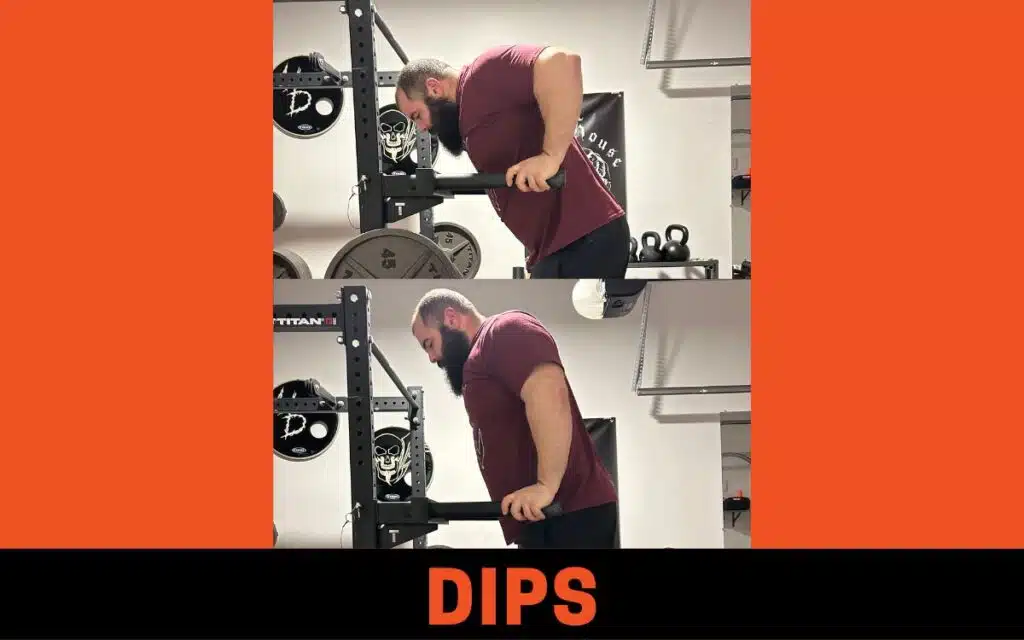
The dip is a great exercise for any push day. The dip forces the arms to perform a pressing motion using tighter elbows, which can help overload the triceps more than a traditional horizontal press. If you struggle to do dips, try doing eccentric or assisted dips in a machine instead.
How To Do It
- Stand between parallel bars, ensuring stability.
- Grip bars, straighten arms, and lift the body vertically.
- Lower by bending elbows, keeping upper arms parallel to the ground.
- Descend until your arms are at 90 degrees.
- Push through palms, straighten arms, and return to the starting position.
- Repeat for reps.
Common Mistakes to Avoid: Some people get nervous while performing the dip exercise. When performing this exercise, you hit 90 degrees with your arms so you don't go too deep and put pressure on your shoulder joint.
5. Seated Dumbbell Overhead Press
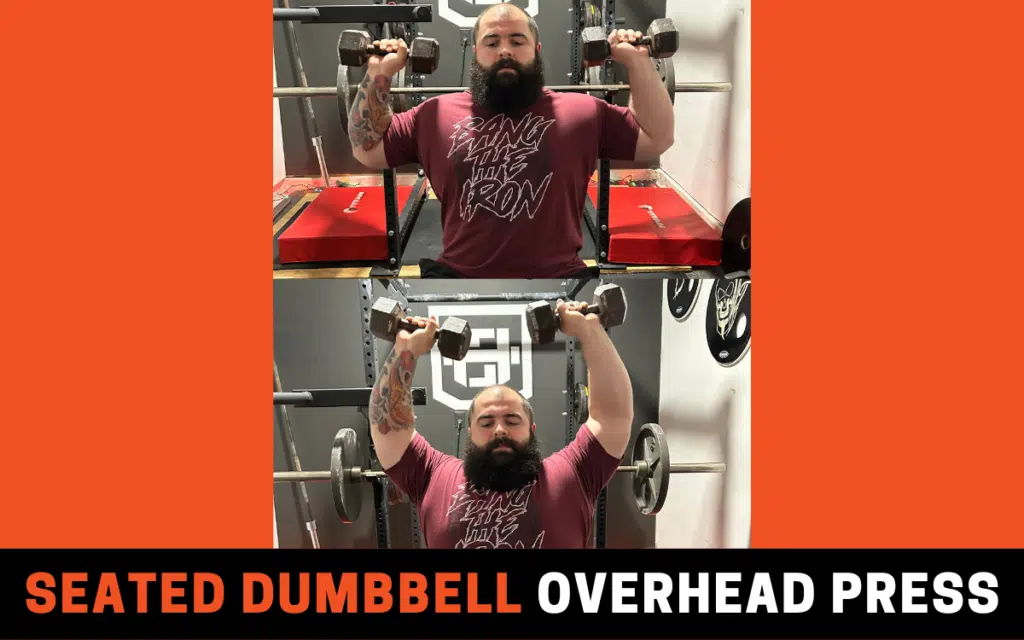
Unlike the traditional barbell overhead press, the seated dumbbell overhead press challenges the lifter's stability. I recommend using a 90-degree incline bench for this exercise.
How To Do It
- Sit on a 90-degree bench with back support and a dumbbell in each hand.
- Bring the dumbbells to where they rest at about shoulder height or by each ear.
- Press the dumbbells up and over your head with the same path as a barbell.
- Stop when your elbows are just shy of being completely locked out.
- Lower the dumbbells back to your ears/shoulder height.
- Repeat for reps.
Common Mistakes to Avoid: Many people will start to arch their back and try to turn this into an incline press. Make sure to sit upright, start lighter, and perform better technique before trying to go heavier.
6. Dumbbell Bench Press
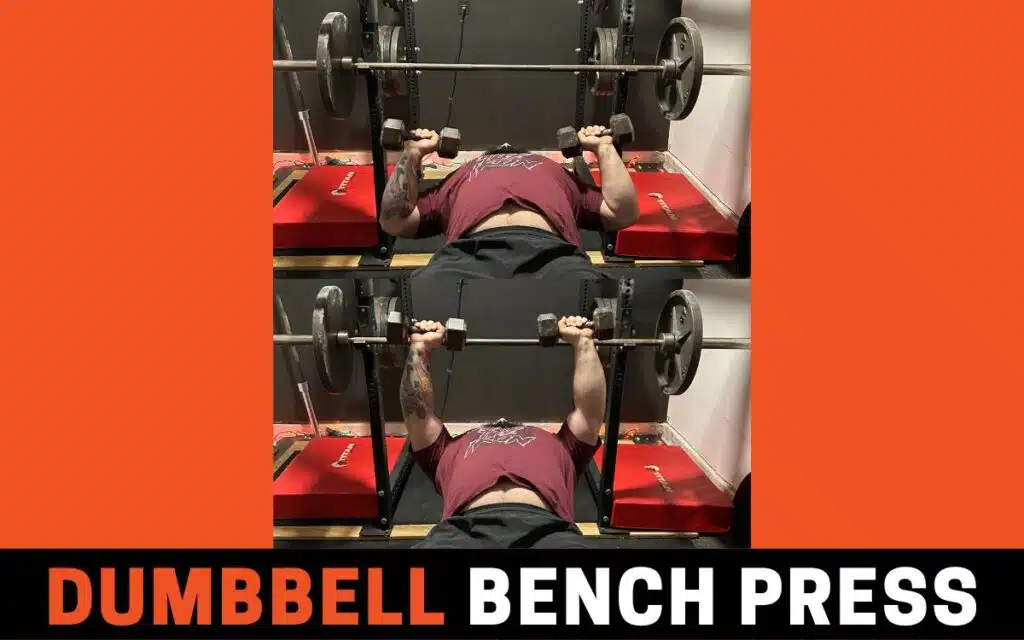
The dumbbell bench press is a great variation of the normal bench press. This movement allows the upper body to be challenged by stabilizing separate dumbbells to help recruit multiple muscle groups besides the pecs. It also allows the arms to move more freely and to engage the inside chest muscles more than with a barbell.
How To Do It
- Lie on a bench with your feet firmly on the ground. It can be a moveable bench, not necessarily a bench press rack.
- Grip a dumbbell in each hand and hold the dumbbells with your arms extended so they rest directly over your shoulder joint.
- Lower the dumbbells to your chest by pulling them to your rib cage, about to the bottom of your pecs. Imagine bringing them to the same touchpoint as if you had a barbell in your hands.
- Press the dumbbells upward, allowing both dumbbells to touch each other at the top.
- Repeat for reps.
Common Mistakes to Avoid: Lifters sometimes treat the dumbbell bench press like a normal barbell bench press. They place their hands too wide, which could put more pressure on the shoulder joint. When doing a dumbbell bench press, it is important to allow the arms to be narrower than a normal bench press and let the dumbbells touch at the top of the movement.
7. Eccentric Bench Press

The most damaging part of any movement is the eccentric phase, also termed the “negative.” When doing the eccentric bench press, the lifter focuses on the downward aspect of the lift, where the muscles stretch the most. This variation of the bench helps to exhaust the muscles more to make it a great hypertrophy push workout.
How To Do It
- Lay on a bench press with your feet firmly on the ground.
- Grip the barbell about shoulder-width apart.
- Unrack the barbell and pull it in front so it sits directly over your shoulder joint when your arms are extended.
- Lower the bar to your chest over a set period – usually 3-8 seconds – by pulling it to your rib cage, about to the bottom of your pecs.
- Strictly follow that time, so you don’t hit your chest before or after your 3-8 second time target.
- Press the bar upward to the resting point over your shoulder joint.
- Repeat for reps.
Common Mistakes to Avoid: A common mistake with the eccentric bench press is people don’t think about stretching the muscle. Make sure that with every rep, you think about the muscle stretching and getting tired to connect better with the movement and build stronger contractions.
8. Dumbbell Overhead Press
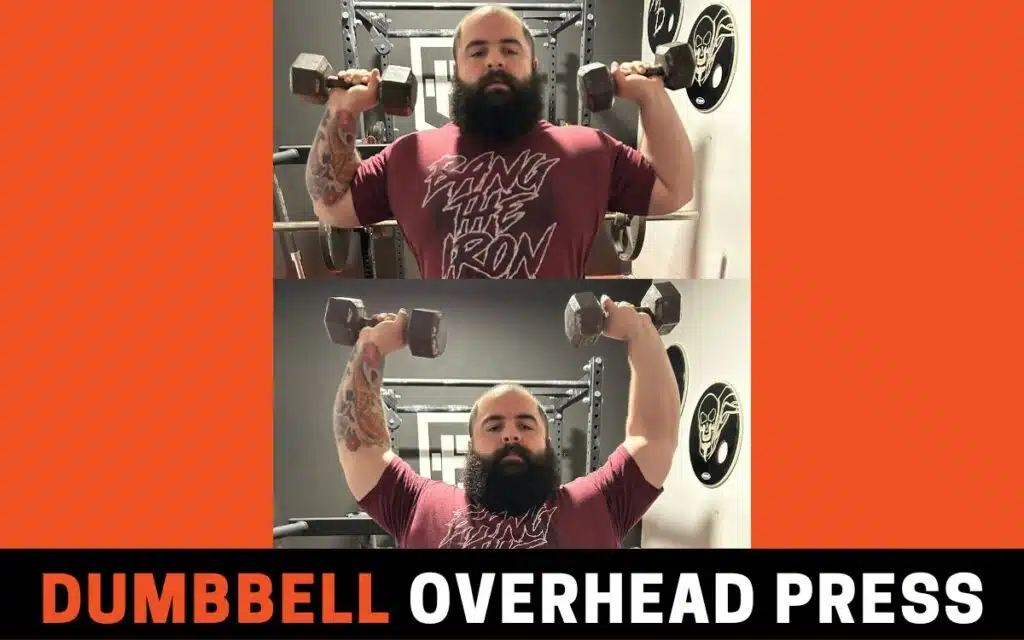
Just like other dumbbell movements on our list, the dumbbell overhead press challenges the lifter’s stability and recruits more muscle groups to execute the movement.
How To Do It
- Stand with a dumbbell in each hand.
- Bring the dumbbells to where they rest at about shoulder height or by each ear.
- Press the dumbbells up and over your head.
- Stop when your elbows are just shy of being completely locked out.
- Lower the dumbbells back to your ears/shoulder height.
- Repeat for reps.
Common Mistakes to Avoid: Some lifters might perform the dumbbell overhead press too deep. Make sure that when you perform this exercise, you get your arms to 90 degrees and allow the dumbbells to touch each other at the top to provide a different motion than you would experience with a barbell.
9. Cable Tricep Pushdown
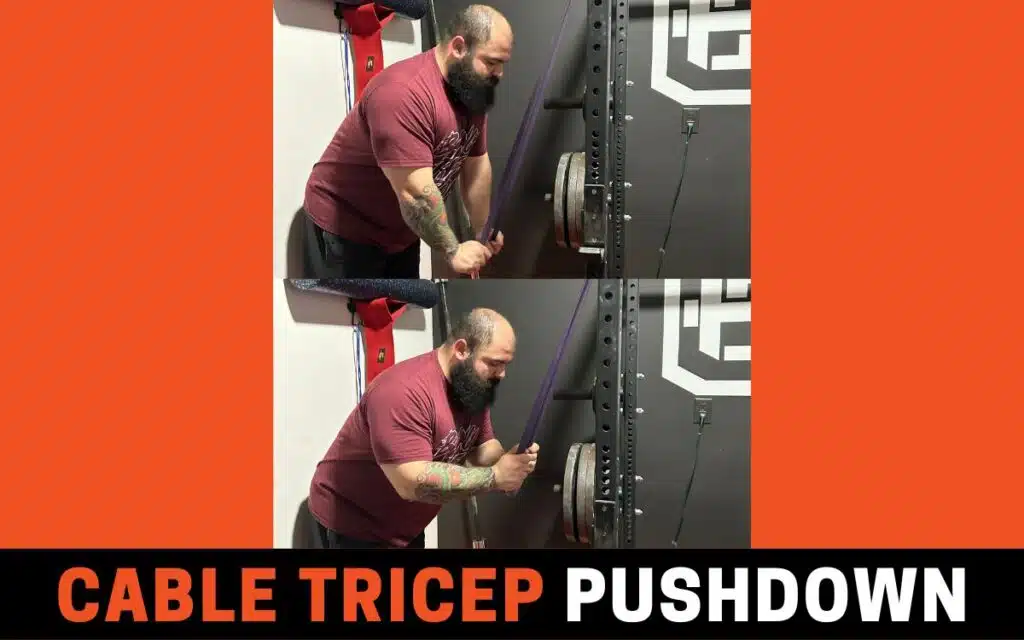
The tricep pushdown is a great accessory movement for any push day workout! This motion helps to isolate the triceps and provides focused recruitment of this muscle group for better growth.
How To Do It
- Attach a cable attachment of your choice to a high pulley on a cable machine.
- Select your weight and set the pin in the stack.
- Grip the attachment and bring your elbow down until it’s locked at your side. Don’t let your elbow travel from this point during the set.
- At this point, your forearm should be at an angle that’s just above 90 degrees.
- Using only your tricep, extend the cable attachment downward, whether single-handed or with both hands.
- Without letting your elbow move away from your side, return the cable attachment to the starting position.
- Repeat for reps.
Common Mistakes to Avoid: Make sure to keep your elbows tight and by your sides. Many people will allow the elbows to go wide, and that might not correctly recruit the tricep muscles effectively. Keeping your elbows tucked at your sides helps isolate the tricep, so no other muscles help in this movement.
10. Low Pulley Overhead Cable Tricep Extension
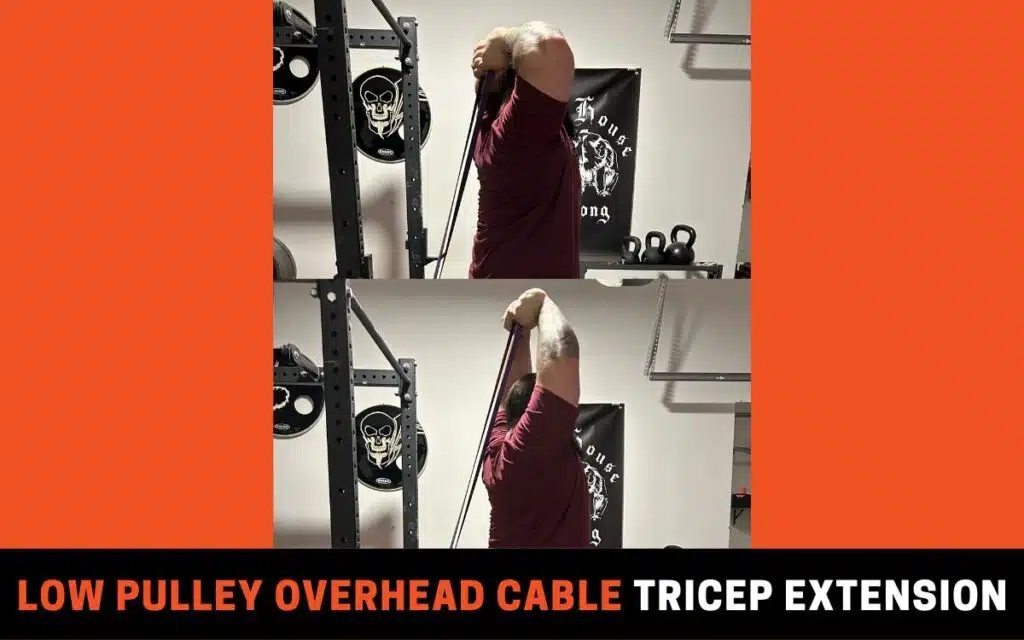
They’re a similar motion as the cable tricep pushdown, except you do them overhead with the cable in a low position. This can help you start to differentiate between the different muscle fibers of the tricep heads.
How to do it
- Attach a bar or rope attachment to a low pulley on a cable machine.
- Select your weight and set the pin in the stack.
- Grip the attachment and turn away from the pulley.
- Bring the attachment into the starting position by holding it behind your head, your humerus/upper arm pointed straight up at the ceiling, and your elbows bent.
- Your arms should hold the attachment against your back.
- Extend the cable attachment overhead using only your triceps, keeping your elbows pointed straight up.
- Without letting your elbows move away from this position, return the cable attachment to the starting position.
- Repeat for reps.
Common Mistakes to Avoid: It is pivotal for the overhead tricep extension to keep that upper arm set so your elbows point up! This applies to using an EZ bar attachment, a straight bar, or a rope. Keep your shoulders out of this exercise and remain motionless to get full tricep isolation.
11. Close-Grip Bench Press
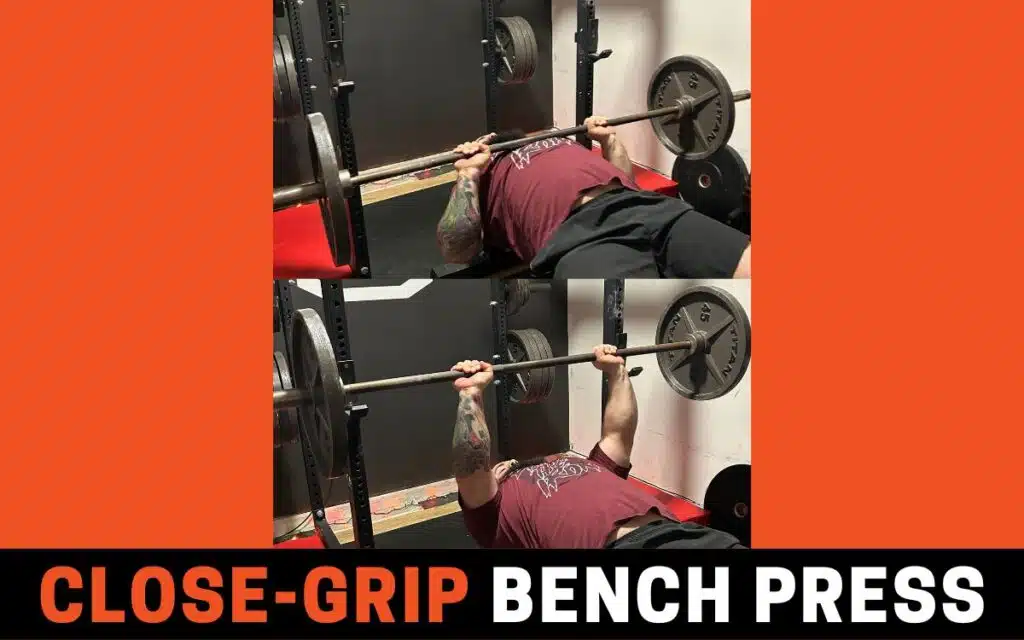
By performing a close-grip bench press, you can make the bench press even more focused on your triceps. It requires you to change your grip to a narrower position, somewhere closer than shoulder-width apart. This will increase the range of motion and put more demand on your triceps, forcing you to push them even further and harder than in a normal grip.
How To Do It
- Lie on a bench press with your feet firmly on the ground.
- Grip the barbell overhead with your hands narrower than shoulder-width apart, at least by a couple of inches. They do not need to be extremely close together.
- Unrack the barbell and pull it in front so it sits directly over your shoulder joint when your arms are extended.
- Lower the bar to your chest by pulling it to your rib cage, about to the bottom of your pecs.
- Press the bar upward to the resting point over your shoulder joint.
- Repeat for reps.
Common Mistakes to Avoid: A close grip bench press doesn’t mean going narrow. If you go too narrow, with your hands near 12 inches apart, this won’t allow you to press effectively and could make it tough on your wrist joint. A close grip bench press is closer than your normal press but enough to where you can still perform optimal pressing mechanics.
12. Overhead Press
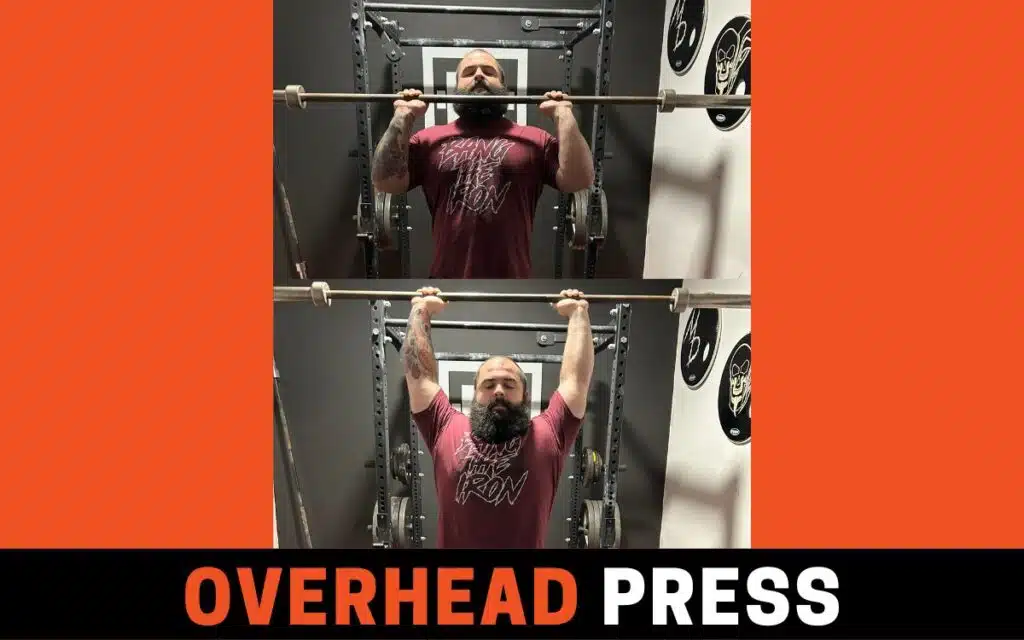
While the bench press allows you to be completely stable with the bench supporting your back as you press, the overhead press is the ultimate pressing movement without the assistance of a bench stabilizing you. This is a great movement to grow your shoulders, and upper chest and could aid your bench pressing power.
How To Do It
- Set up a barbell on a high rack so you can hold it under your chin, resting at about shoulder level.
- Take the barbell in your hands and unrack it, stepping back from the rack.
- Press the barbell over your head so it ends directly above your shoulder joints.
- Ensure you are not leaning back at the end. Stand upright and stay balanced.
- Return the bar to your chest/shoulder height.
- Repeat for reps.
Common Mistakes to Avoid: Don’t arch your spine to take advantage of your overhead press. This excessive bend of the spine could be dangerous and cause injury. When doing the overhead press, be strict with form, stay upright, and engage your core from start to finish.
13. Dumbbell French Press
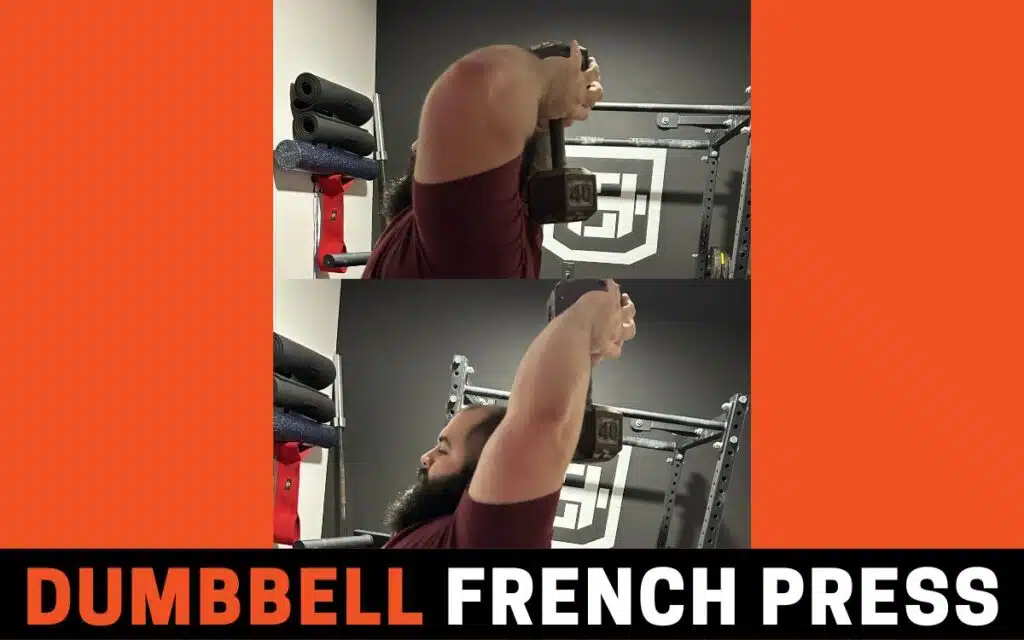
Similar to the overhead cable extensions, you can target the triceps with a dumbbell by performing a French press, also known as a French curl.
How To Do It
- Hold a single dumbbell with both hands behind your head.
- Ensure your upper arm is pointing up, with your elbow pointed at the ceiling.
- Using only your triceps, extend the dumbbell upward until your elbows lock.
- Lower the dumbbell back to your starting position.
- Repeat for reps.
Common Mistakes to Avoid
The most common mistake made with the French press is hand placement. Instead of gripping the metal bar between the weight on the two ends, let the dumbbell sit vertically in your hands as you hold one head with both hands. This will allow you to grip the dumbbell more comfortably and still have an optimal range of motion and balance.
14. Push-Up
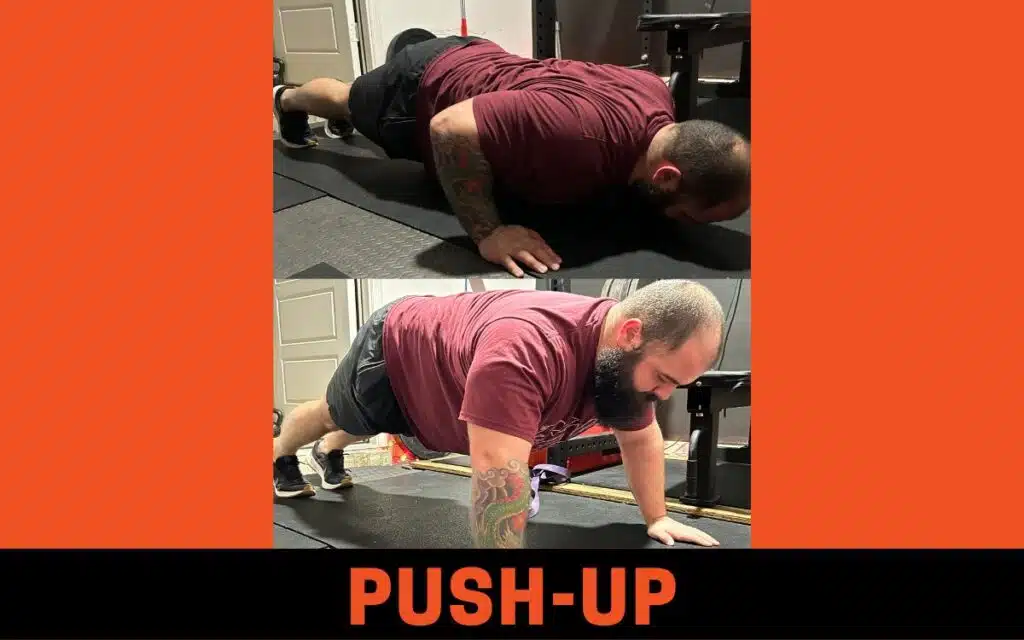
There is no excuse to miss a push day. The push up is an iconic push day exercise that can be used in any program, from novice to advanced lifters.
How To Do It
- Lie face down on the floor with your hands shoulder-width apart on the floor and palms down.
- Push your body up with your hands, keeping your hips and knees locked in a plank position.
- Lower yourself back to the floor until your chest touches it.
- Repeat for reps.
Common Mistakes to Avoid: When doing the push up, some lifters might drop their hips and let their spine bend. This can change how tough the push up can become, so make sure when you do push ups to keep your whole body straight, from head to toe. If normal push ups are too tough, put your hands on an elevated platform to take away the amount of resistance on your hands.
Which is better, the bro split or PPL split? If you aren’t sure, check out our article about the differences between the bro split and PPL split and how to choose the right programming for you.
Muscles Used in Push Day Workouts

When performing these workouts, the push day muscles are:
- Pecs: Your pecs, or chest muscles, are your primary pushers. They work the hardest in exercises like bench presses and push-ups.
- Triceps: The triceps extend your arm at the elbow (the opposite of your biceps) to push a load completely away from your body once your pecs have done their job to get it away from your torso.
- Shoulders: Your shoulders are key pressing muscles used in the bench press, overhead press, push-ups, and isolated shoulder exercises.
Want to train your chest but don’t have a bench? Check out this article that gives you ideas on how to train your chest with dumbbells and without a bench for your workout.
Pro Tips for Push Day Warm-Up
To prepare for a push day workout, it's important to pick three exercises that focus on warming up the three pressing muscles – the pecs, triceps, and shoulders. Below is a warm-up routine I use with athletes to prepare them for a push day workout.
Warm-Up Circuit – 3 or 5 rounds of 12-20 reps at RPE7 intensity for each exercise
- Cable Tricep Pushdowns
- Dumbbell Front Raises
- Chest Press Machine
The weight for this circuit shouldn’t be too heavy, so I mention an intensity of RPE7. This routine recruits the pressing muscles differently and from different positions to help prepare the body for a top push day workout. I recommend athletes to do a superset of three exercises for one set, then rest for 30-60 seconds before the next round. This would be done before the push day workout begins.
Can push ups help with your bench press? Check out this article that talks about the push up’s effect on the bench press and its impact on your pressing performance!
Frequently Asked Questions
How Many Exercises Should You Do on Push Day?
Like any workout, the best push day workout should include 3-6 total exercises for 3-5 sets each. These will be focused on exercises that use your pecs, shoulders, and triceps and require you to push a load away from your body.
Are Biceps Pull or Push?
Biceps are a pulling muscle, so they would not be included in a push day. Rather, the triceps muscles on the back of the arm are push muscles. The triceps extend the elbow, whereas the biceps contract (bend) the elbow.
How Do You Structure a Push Day?
Typically, the best push workout will include only pushing movements that rely on the pecs, shoulders, and triceps. Start with a warm-up, then perform your most difficult, heaviest exercises (like the bench press) first. Then, progress to simpler and lighter movements. Doing 3-6 exercises of 3-5 sets each is common.
What are the Lower Body Push Muscles?
Push day exercises for legs focus on your calves, glutes, and quads. The muscles help your legs push, or rather “extend” to increase in range of motion. These muscle groups are known to be extensors of the hip, knee, and ankle joints.
About The Author

Adam Gardner is a proud resident of Utah, where he lives with his wife and two kids. He has been competing in powerlifting since 2016 in both the USPA and the APF. For the past three years, he and his wife, Merrili, have coached beginning lifters to learn the fundamentals of powerlifting and compete in their first powerlifting competitions.