

You're inches from locking out a deadlift and you can't get your hips through and shoulders back. You fail your deadlift at lockout. This is a frustrating experience, especially when you're going for a personal best. The good news is that you can train your lockout in specific ways so that you never fail a lift in the top range again.
Here are my 10 tips to improve your deadlift lockout:
- Fix Your Bottom Position
- Fix The Timing Of Your Lockout
- Identify The Muscles Involved
- Take Advantage Of Your Leverages
- Work On Your Grip
- Do Pause Deadlift Combos
- Perform Isometric Contractions
- Do Rack or Block Deadlifts
- Do Banded Deadlifts
- Adjust Your Training Program
Table of Contents
Tip #1: Fix Your Bottom Position For A Stronger Deadlift Lockout
The main cause of failure in a deadlift is a lack of technique in the bottom position.
The bottom position is critical to your success in the deadlift. Being out of position will cause some muscle groups to over-work and fatigue quicker, which means there's less strength when you get to the lockout.
For example, if you are leaning too far over in the start position, then your low and mid-back will take on a lot more loading than necessary in the bottom. This will be disadvantageous because your back will be used to get your hips through and shoulders back at the lockout, and may already be fatigued.
Furthermore, once you're out of position at the start of the lift, it's very hard to correct and get back into the right groove once you have momentum on the bar. Check out my article on the best deadlift bar path.
The lesson is that if you can be in the most optimal position from the start, it will make the entire lift a lot easier.
If you want to learn more deadlift cues, make sure to check out our article on the TOP 10 DEADLIFT CUES FOR STRONGER PULLS.
Here are some general pointers for what to look for in the bottom position of the deadlift:
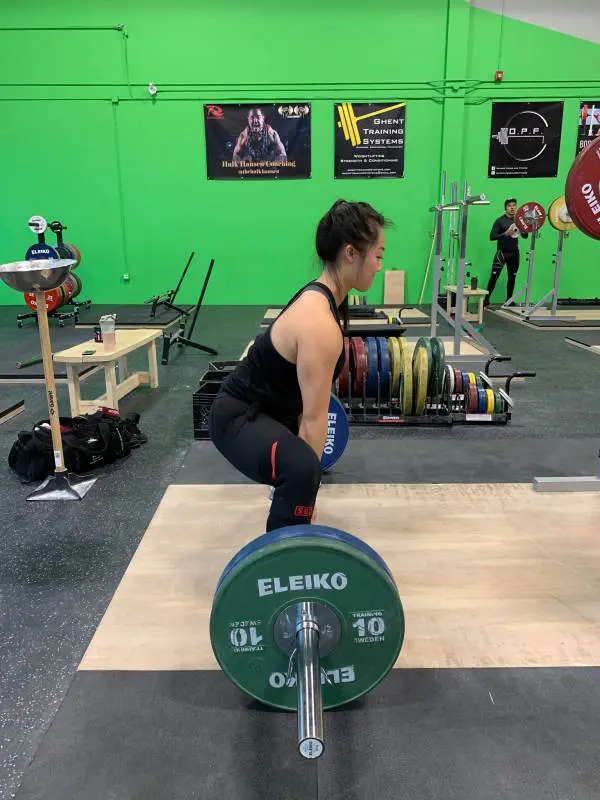
Conventional Deadlift Bottom Position

Focus on the angles: If you draw a line from your shoulders down to the barbell they should either be directly on top of the barbell or just slightly in front. For someone with a shorter torso, your shoulders will be more in line with the barbell; and for someone with a longer torso, your shoulders will be more in front of the barbell. Avoid leaning too far forward where your back begins to look parallel to the floor.
Sumo Deadlift Bottom Position
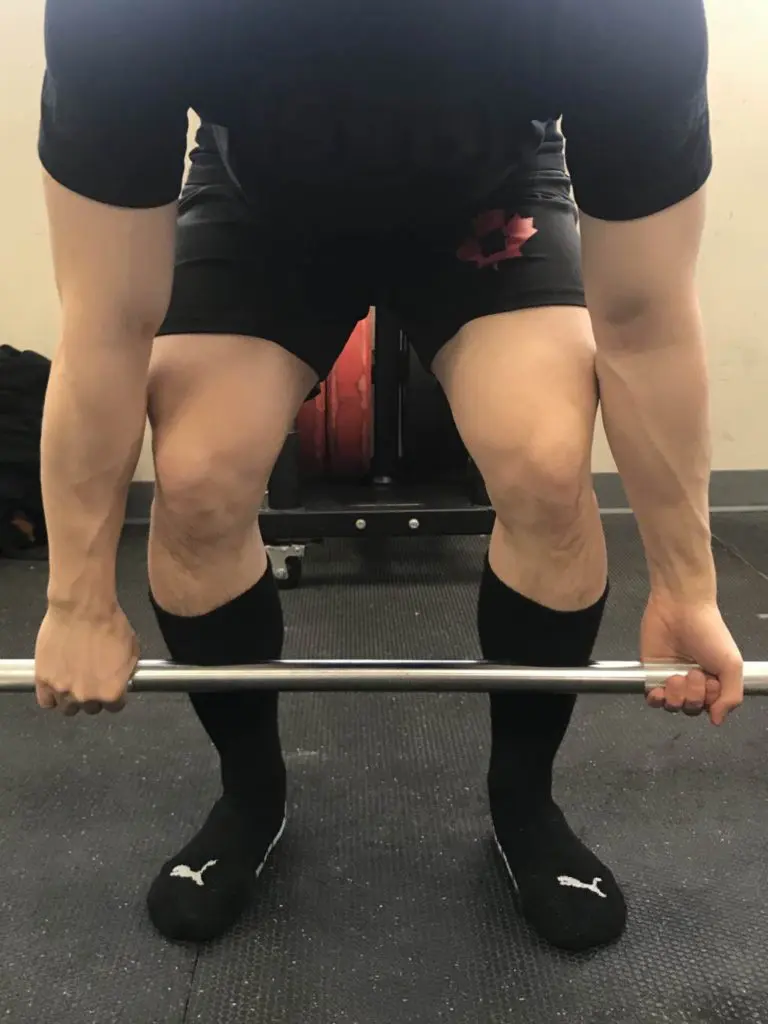
Focus on the angles: You want to optimize for three key angles: (1) your shoulders should be directly on top of the barbell, (2) your shins should be as vertical as possible, and (3) your hips should be as close to the barbell as possible. Based on your individual mechanics, one or more of these key angles may be difficult to get exactly right. But, work with what you got and try to optimize as much as you can.
Initiating The First Pull
Regardless if you deadlift conventional or sumo, you'll want to focus on these two principles when initiating the first pull off the floor:
- Focus on the bar in relation to your foot: You want the barbell to be directly over the midline of the foot. By doing this, your shins should be touching the barbell. Don't start with the barbell off you (even though it might cause shin bruising). If the bar comes off of you it will be hard to keep your balance at lockout.
- Take the slack out of the bar: Before pulling the bar off the floor, pull up on the bar to get tension between your arms and the load. If you don't do this it will be much easier for the bar too'pull you' out of position, which causes the bar to yank you forward.
- Avoid hips rising faster than the bar: If your hips shoot up before the bar leaves the ground your glutes and spinal erectors may be too fatigued by the time you get to your lock-out.
Tip #2: Fix The Timing Of Your Deadlift Lockout
You may be failing at lockout because you've mistimed your hip and knee extension.
For most people, the timing of your hips and knees locking out in the deadlift should be simultaneous. What this looks like is at the final phase of your deadlift, the hips and knees lock at the same time.
Here are two great examples of locking your hips and knees at the same time (both conventional and sumo):
If you lock your knees too early, you risk having the bar pull you forward, which may cause you to lose your balance.
If you lock your hips too early, you risk hitching the bar, which means the bar rests on your thighs. This may not be a concern for some people, but if you're a competitive powerlifter then you can't hitch the bar in competition — so you'll want to practice how you compete. The other problem is that you might hit your knees when deadlifting if you lock your hips too early.
I give you a good method for working on your deadlift lockout timing in tip #6.
Tip #3: Identify the Muscles Involved In Your Deadlift Lockout
If your bottom position is on point and your lockout timing is perfected, then you may be failing because of weak muscle groups.
So, what exactly are the muscles involved in the deadlift lockout?
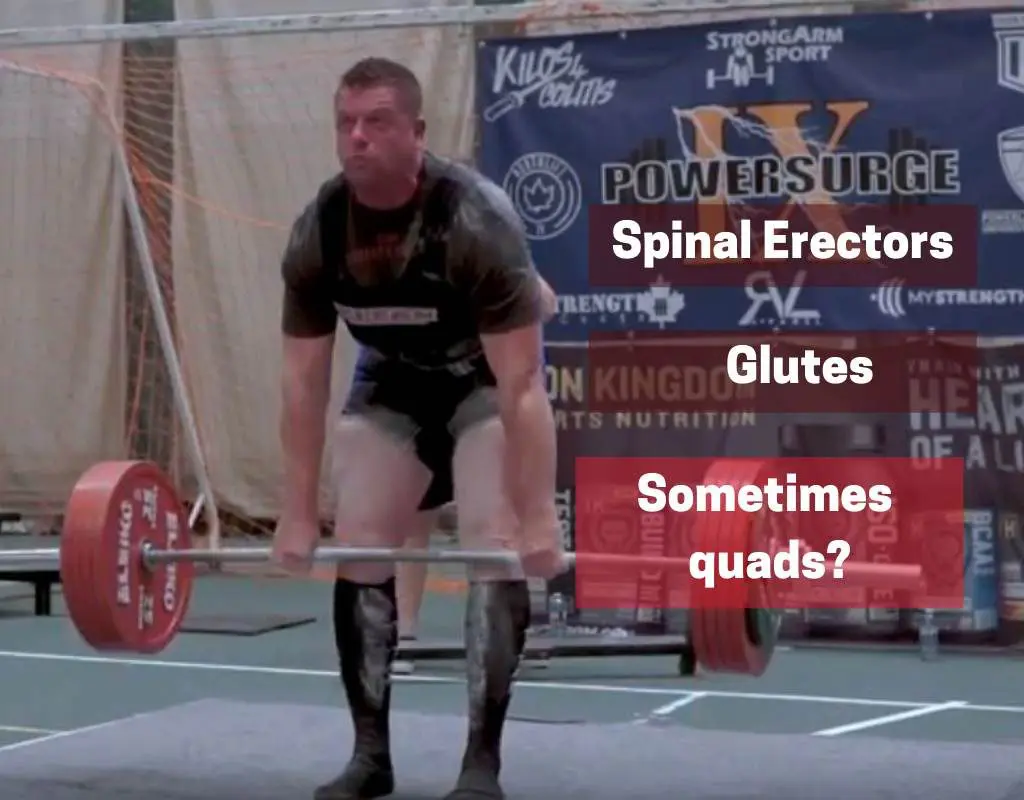
The lockout is initiated by both hip and back extension. Hip extension puts loading demand on the glutes, and back extension puts loading demand on the spinal erectors.
Focus on developing stronger glute and spinal erector muscles to target the deadlift lockout.
I'll be providing some specific exercises later on to target these muscle groups (tips #7-9).
Check out my related articles on Building a Strong Deadlift Position Off The Floor and Building a Strong Deadlift Position At The Knees.
Your Quads Could Be The Problem Too
Remember how I said earlier that your back and glutes will be too fatigued at lockout if your hips rise too early as you initiate the pull of the floor?
If this is the case, it doesn't mean that you need to do more back and glute exercises. It means that you need to work on the weak muscles involved in the bottom of the deadlift, so that the proper muscles are doing their job at each phase of the movement.
If your hips are shooting up out of the bottom position, the problem is that your knee extensor muscles, primarily your quads, aren't working properly in the bottom of the deadlift and so your back needs to compensate for this weakness. If you develop stronger quads, then your legs can do more of the work at the bottom of the deadlift, so your back is much more capable of doing its job at lockout.
What's the lesson?
Get your glutes and spinal erectors stronger if you have a solid start position.
Get your quads stronger if you do not have a solid start position.
If you struggle with your deadlift lockout it could be a sign that you're deadlifting too much
Tip #4: Take Advantage Of Your Leverages
If you aren't taking advantage of your natural leverages than you may have a harder time locking your deadlift out.
When you hear the term ‘leverages' it's used to describe how someone is built — typically how short or long someone's torso, legs, or arms are as they relates to one another.
Certain leverages are more advantage from a range of motion perspective. For example, if you have shorter arms, this may be advantageous for bench press because you're pressing the bar a shorter distance. However, these same leverages would be disadvantageous for deadlift because you're pulling the bar a longer distance.
While you can't control your natural leverages, you can do the best you can with how you're built by following some basic guidelines. These guidelines will help you position yourself around the barbell to lift the weight with the least range of motion as possible. Ultimately, these will make the lockout easier.
Check Your Foot Stance
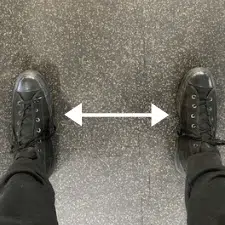
For a conventional deadlift, you want your feet directly under your shoulders or slightly inside shoulder width. If they are any wider then you are increasing the range of motion that you have to pull the bar to lockout.
Check Your Hand Width
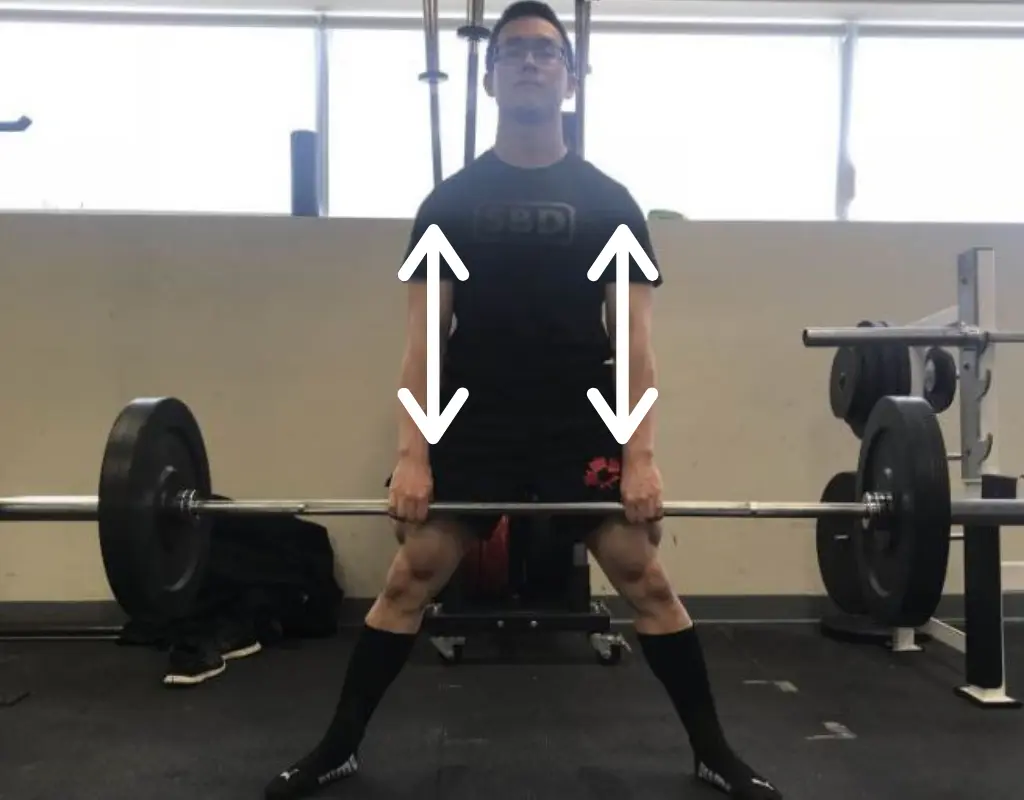
The wider your hands are on the bar, the more range of motion you’ll be pulling. Generally speaking, you want your deadlift grip to hang straight down from your shoulders. You maybe be slightly narrower or slightly wider than this, but just remember a wider grip will make it more difficult at lockout.
If your deadlift is weak in the lockout you should try out one of my deadlift progressions that will help you take your lift from beginner to advanced.
Check Where The Bar Is In Your Hand
If you grab the bar closer to the base of your hand then you’ll be pulling a greater range of motion. Try putting the bar directly under your knuckles.
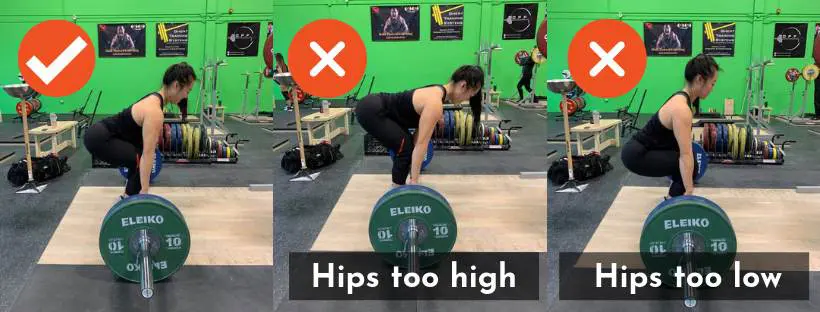
Check Your Hip Position

If you treat the deadlift like a ‘squat’, and you have your hips too low in the start position, then the range of motion will increase. If your hips are below your knees then you’ll want to bring your hips higher up to leverage a better bottom position, and thus making the lockout easier.
If you're a tall lifter, you'll need to also implement the tips outlined in my article on Deadlifting For Tall Guys.
Tip #5: Work On Your Grip So You Don't Drop The Bar At Lockout
You may be failing your deadlift at lockout because of grip issues. In other words, you get close to lockout and the bar slips from your hand.
We wrote a guide on training your deadlift grip, so if you're failing your deadlift because of grip I highly encourage you to read that full article.
However, the main points to getting a stronger grip for deadlifts are:
- Pick the grip style that yields the most amount of strength in your hands, whether that's double overhand grip, mixed-grip, or hook grip.
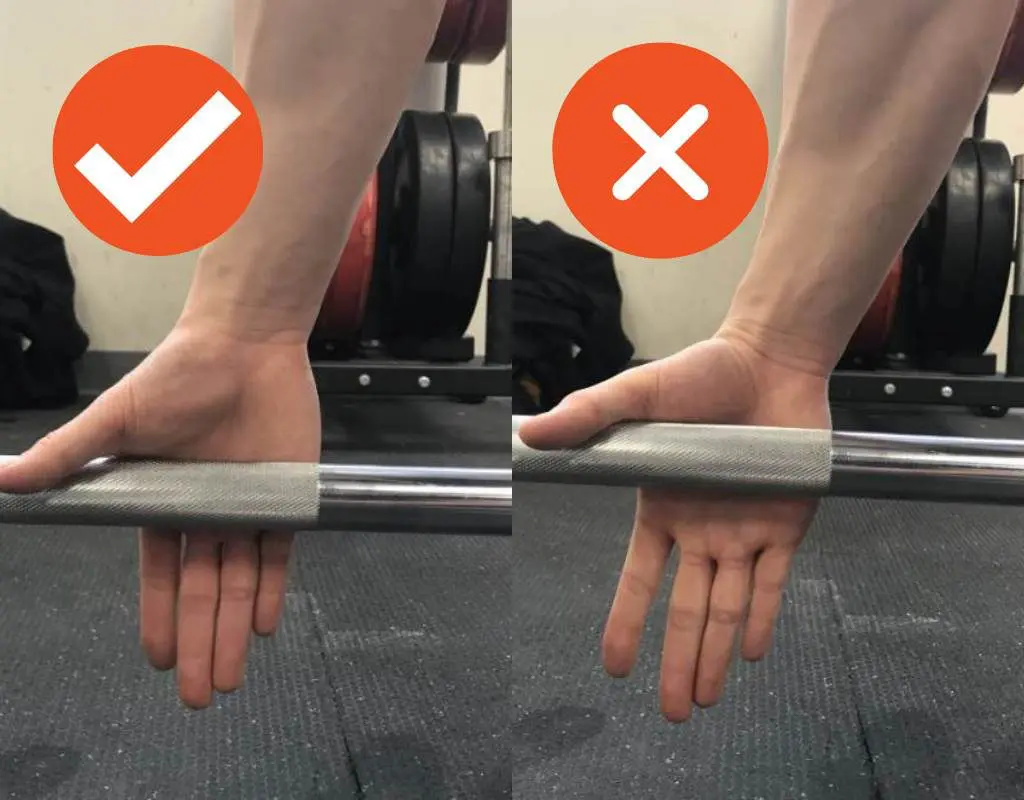
- Grip the bar properly, which means (1) grabbing the bar evenely, (2) grabbing the bar in line with your shoulders, and (3) placing the bar in the centre of the hand.
- Train your grip using ‘extended holds' with the barbell. This can be achieved by simply holding the final rep at the end of each set for 10-seconds, or by implementing a specific grip routine. If you have access to hand grippers, you can check out my article on How To Use Hand Strengtheners.
If you're a competitive powerlifter, then there's two other suggestions: (1) use weightlifting straps sparingly so that you don't compensate for weak hands, and (2) make sure you have a hand care routine that includes eliminating calluses.
Tip #6: Do Pause Deadlift Combos For Reinforcing Your Timing At Lockout
Your deadlift lockout can get better by working on the timing of your hips and knees.
As I previously mentioned, your hips and knees should lock at the same time as you finish the lift.
One of my favorite exercises to work on the timing of the deadlift lockout is a pause deadlift + deadlift combo. This combo is where you'll do some reps paused followed by some regular deadlift reps.
A typical 4-week progression for one of my athletes looks like this:
Week 1: 4 sets of 3 (paused reps) + (3 regular reps) @ 65% of 1 rep max
Week 2: 4 sets of (3 paused reps) + (3 regular reps) @ 67.5% of 1 rep max
Week 3: 4 sets of (2 paused reps) + (2 regular reps) @ 70% of 1 rep max
Week 4: 5 sets of (2 paused reps) + (2 regular reps) @ 72.5% of 1 rep max
You would start with paused reps just below the knee. You're pausing just below the knee because that's the point of transition of where you shift the loading demands from your knee extensors to your hip extensors.
Once you've paused, you'll then want to think about pulling explosively out of that position, bringing your hips toward the bar. The goal is to have your hips and knees locking at the same time.
After completing the paused reps, you'll move into regular deadlift reps. This is the phase of ‘putting it all together after emphasizing just the lockout from doing the paused reps.
The loading for this method isn't supposed to be all too challenging. The weight should provide you with a meaningful resistance, but the goal is to work on technique rather than build strength.
Related: 18 Exercises To Improve Deadlift Technique
Tip #7: Perform Isometric Contractions To Build Deadlift Lockout Strength
Performing isometric contractions at a weak position within the range of motion can build strength.
Isometric exercises are muscular contractions where the muscles are neither lengthening or shortening, as is the case when either bringing the bar down or up. When doing isometric training, the muscle length is held static within a particular range of motion.
The reason why isometric training works for building strength is because you're contracting your muscles within a targeted range of motion, offering greater time under tension at the weakest portion of the lift.
One of the best exercises for building lockout strength is an isometric deadlift (click to read my full guide).
It's a bit awkward to set up, but you'll want to take a barbell into a squat cage and place it underneath the safety pins. As you lift the barbell off the floor, it should hit the safety pins at knee height, which will prevent you from standing up fully. The goal is to pull against the safety pins as hard as you can for a prescribed amount of time.
A typical 4-week progression for one of my athletes looks like this:
Week 1: 4 sets of 1 rep, holding for 20-sec @30-35% of 1 rep max
Week 2: 4 sets of 1 rep, holding for 30-sec @30-35% of 1 rep max
Week 3: 4 sets of 1 rep, holding for 20-sec @35-40% of 1 rep max
Week 4: 4 sets of 1 rep, holding for 30-sec @35-40% of 1 rep max
You won't need a lot of weight for this movement as it's more important that you're pulling the bar as hard as you can against the pins for the prescribed time without breaking contact with the pins.
Tip #8: Do Rack Or Block Deadlifts To Build Deadlift Lockout Strength
Performing top end specific exercises like rack or block deadlifts can build deadlift lockout strength.
The rack deadlift or block deadlift are variations that most people can pick up fairly easily, and they're the most specific way to train the deadlift lockout using a significant amount of loading.
The rack or block deadlift is essentially the same movement. The idea is that you're performing a partial range of motion where you're the weakest. The rack deadlift is performed in the squat cage with the bar starting on the safety pins. The block deadlift requires some sturdy boxes where the bar starts on the blocks.
Setting up these movements is identical. You'll set up the pins or blocks so that you're starting the deadlift either at either just below knee height, knee height, or just above knee height, depending on where you're the weakest. These exercises will put an emphasis on your hip and back extensor muscles, which are required to lockout the deadlift.
A typical 4-week progression for one of my athletes looks like this:
Week 1: 4 sets of 6 rep @67.5-72.5% of 1 rep max
Week 2: 4 sets of 5 rep @72.5-77.5% of 1 rep max
Week 3: 5 sets of 5 rep @75-80% of 1 rep max
Week 4: 6 sets of 4 rep @77.5-82.5% of 1 rep max
Depending on the severity of your weakness in your lockout you may need to adjust the load accordingly. By the 4th week, you'll want to be working relatively close to your fatigue limits.
Another exercise I like to program for my athletes to build deadlift lockout strength is the high box squat. This squat variation will target the hip extensors to a greater extent, which will transfer to the lockout of the deadlift.
Tip #9: Do Banded Deadlifts To Build Lockout Strength
Banded deadlifts provide greater resistance at lockout, which will build strength in the top range of motion.
As Mark Bell says:
The banded deadlift forces you to accelerate faster into the barbell.
In short, the banded deadlift will force you to keep driving through the entire range of motion, cueing you to ‘speed up' into the top end, not slow down. One main cause of a sticking point is the deceleration of the barbell within a certain range of motion. As such, you'll want to think about generating as much speed on the bar as possible before your sticking point in order to drive the momentum into the lockout.
Setting up the banded deadlift requires a single band. Depending on the amount of tension you want at the top, you can choose between a 1-inch or 2-inch band. Here's a good video showing you how to set up the bands over the barbell:
A typical 4-week progression for one of my athletes looks like this:
Week 1: 6 sets of 3 rep @60-65% of 1 rep max + 1-inch or 2-inch band
Week 2: 6 sets of 3 rep @60-65% of 1 rep max + 1-inch or 2-inch band
Week 3: 8 sets of 2 reps @65-70% of 1 rep max + 1-inch or 2-inch band
Week 4: 8 sets of 2 reps @65-70% of 1 rep max + 1-inch or 2-inch band
The load on the barbell should be relatively moderate, with the band providing a greater resistance at the top end. Unlike the rack or block deadlift, the goal with the banded deadlift is to pull the bar with speed, rather than struggle at lockout.
You can also do Reverse Band Deadlifts, which attach the bands from the top vs bottom. Check out my other article where I explain this exercise.
Tip #10: Adjust Your Training Program To Emphasis Your Deadlift Lockout
If you want to improve your deadlift lockout you will need to make sure there is a focus on top end deadlift strength within your training program.
You'll want to address three primary considerations: 1) training frequency, 2) exercise selection, and 3) progressive overload.
Training Frequency
If you're only deadlifting once per week, you're simply not getting enough time in the movement to practice your technique and get stronger.
At the minimum, I would plan two deadlift workouts per week. If you plan on doing three deadlift workouts per week, you might need to reduce the amount of squatting temporarily until you become adjusted to the higher deadlift frequency.
With that said, you should be able to make adequate progress with your lockout at two times/week deadlift frequency if you focus on the other two considerations below.
Exercise Selection
I've now provided you with 4 exercises that you can implement within your training program to target your deadlift lockout:
- Pause deadlift combos
- Isometric deadlifts
- Rack or block deadlifts
- Banded deadlifts
I would not implement all four of these exercises within the same training program. I would select one of these exercises, perform it for 4-weeks with the progressions laid out above, then switch to another variation in the next training block.
If you deadlift twice per week, one of your workout can be focused on straight deadlifting while the other workout can be focused on the variation you choose.
Progressive Overload
This is the idea that you're increasing your volume or intensity over time.
As you implement the deadlift lockout variations, you'll want to make sure that you're doing slightly more sets, reps, or load over the course of the training program.
If you follow the 4-week progressions that I laid out above this will automatically include progressive overload. You might find that one variation produces greater results for you, in which case you might want to extend those progressions out over the course of a longer time period.
Lastly, make sure to program regular assessments (every 8-12 weeks) in order to test your deadlift. You'll want to guage the effectiveness of the training program and whether the improvements in technique and variations are working for you.

Final Thoughts
Improving your deadlift lockout requires both technical and strength adaptations.
The easy wins will be working on various elements of your technique, which include finding an optimal bottom position, timing the lockout effectively, and setting your grip properly. Once your technique has improved, start implementing some focused strength work around your lockout position.
If you commit to improving your technique and implementing top-end strength work, you should be improving your deadlift lockout within 8-12 weeks.