

Setting up the deadlift effectively requires you to take the slack out of the bar before initiating the movement. Pulling the slack out of the bar allows you to build tension through your whole body, making you more capable of controlling the barbell under load.
How do you pull the slack out of the bar? It’s a three-step process that requires you to take a big breath, tighten your lats and hamstrings, and actively pull up on the bar before lifting the barbell off the floor.
I have a saying, it’s that, if you don’t pull the slack out of the bar, the bar will pull the slack out of you. This technique is so important that it could be the difference between you failing the lift off the floor and locking the weight out successfully.
Let’s learn more about what this technique means and how to implement it correctly.
Table of Contents
What Does It Mean To “Pull The Slack Out Of The Bar”?
Pulling the slack out of the bar is an important technique that I've used for many years with both myself and the lifters I coach to see success in the deadlift.
Let me first explain what it means to pull the slack out of the bar.
The barbell is made of rigid steel. But, there's “give” to the bar.
There's give in the actual barbell shaft itself, there's give in the way the shaft comes into the bearings on the sleeve, and there's give in the way the sleeve come onto the plate.
The simplest way to conceptualize this last point is that there is a tiny amount of space between where the barbell sits on the floor, and where the plates sit on the barbell. This gap between the bar and the plates creates a lack of tension or ‘slack’ when you pull the bar.
What we want to do is pull all of that out of the barbell before we initiate the lift.
By doing this you create whole body tension between you and the barbell.
If you want to learn more deadlift cues, make sure to check out our article on the TOP 10 DEADLIFT CUES FOR STRONGER PULLS.

Want to improve your deadlift technique?
How To Pull The Slack Out Of The Barbell?
I'm going to walk you through a three-step process that I use when I'm teaching athletes how to pull the slack out of the barbell.
Before starting, it’s important to note that the steps might seem really basic, but it can actually be quite difficult to implement correctly under load.
Also, the sequence that I’ll be teaching needs to be learned step-by-step. You can't jump from one step to the next before you've really got the hang of step one. If you try to jump to step three immediately and try to mix all the steps together you'll end up just stunting your own learning process.
Here are the three steps:
- Step 1A: Breath In
- Step 1B: Pull Slack
- Step 2: Bring Hips To Barbell
- Step 3: Initiate Movement
Let’s cover each of these in more detail.
Step 1A: Breathe In
Before you even initiate the lift, you need to bend over and grab the barbell with your hands. You will leave your hips high and your legs relatively straight while you’re doing this.

Once you’re in this position, the first phase of step one is to take a deep breath in. You’ll want to hold this breath throughout the remaining part of the deadlift set up.
Step 1B: Pull Slack
The second part of step one is to literally pull the slack out of the bar.
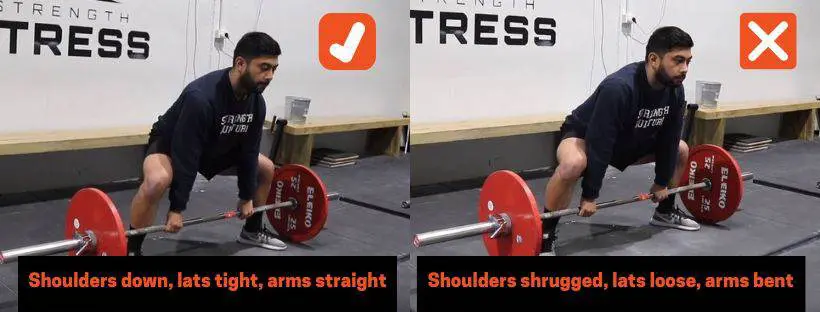
What this will feel like is that you’re pulling your body up on the barbell. As you do this, you’re creating tension through your whole body — back, spine, and hips.
As you pull the slack out of the barbell, your back will flatten, and you will actively engage your lats and hamstrings. When you do this correctly, you should hear a ‘clang’ of the barbell against the plates. This is the barbell closing the gap between it and the plates.
The barbell is not lifting from the floor at this point, it’s only lifting into the plates as you create tension between yourself and the barbell. Your body might shift backward slightly to load your lats and hamstrings.
Take a look at the video below and listen to the ‘clang' of the plates against the barbell when you pull the slack out (turn on the sound).
One of the ways I like to describe pulling the slack out of the barbell is that you get the sensation you’re pulling the barbell with your fingertips. It's like your fingers just kind of grab the bar. You’re not bending your arms or pulling with your arm — just think about using your fingers to ‘pull up’.
As a drill, you should breathe in and pull the slack out of the barbell 5 times for 4-5 sets to practice what this motion feels like.
This might seem extremely simple and it might even be boring, but this is literally how you have to learn.
You'll have more slack to pull out of the barbell if you're using a ‘deadlift-specific barbell'. Check out my article on the deadlift bar vs stiff bar to learn more.
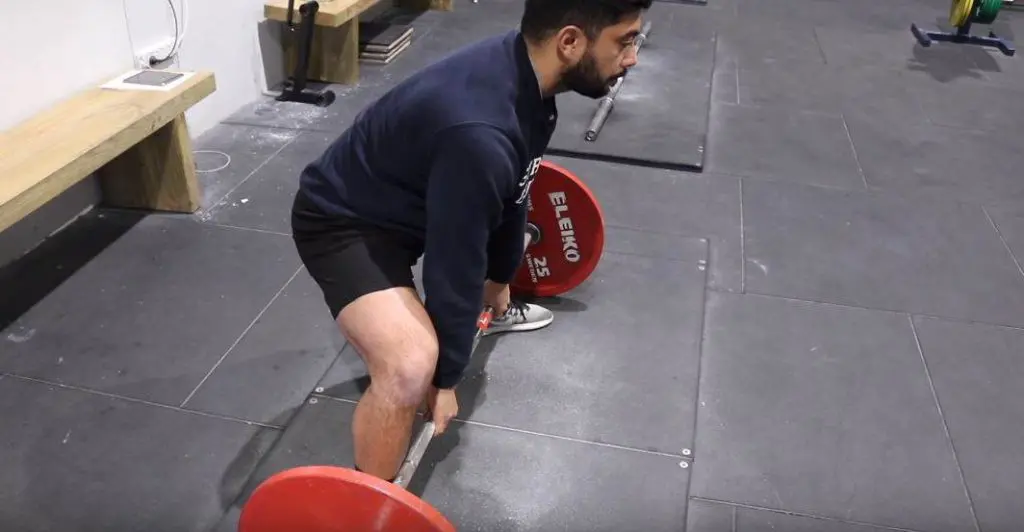
Step 2: Bring Hips To Barbell
Step two is when you come down into your deadlift position. So, it's pretty much everything without lifting the bar.
This is the hardest part to get right because there are a lot more moving parts.
From the moment that you've got the slack out of the bar, and you’ve created tension between you and the barbell, you need to get your hips into position by dropping them down.
The big mistake that a lot of people make is they release the tension they've built up previously and yank on the barbell anyways, which completely nullifies the first step.
What this will feel like is losing tension in your lats as it probably means you’re bending your arms as you bring your hips to the barbell.
A good way to think of it is that as the hips come down into position you should actually be increasing the pressure against the bar.
So let's say the barbell was loaded to 200 kilos, I might start putting 70 kilos of effort into the bar, then as I bring my hips closer to the floor, I would start pulling 100 kilos of effort, then 140 kilos, then 180 kilos, and then once the hips are set, the barbell comes off the ground because I’m applying the full 200kg of effort.
Takeaway: As your hips are coming down, you’re building pressure and increasing the amount of force you have so that way as soon as you're in the bottom position the bar wants to come up off the ground.
An important position to note is that in step one your shins should be off the barbell. However, in step two your shins should meet the barbell.
You should use this as a cue or trigger that as soon as your shins touch the bar that you can lift the barbell from the floor. I always say socks to bar or pants to bar, and when they touch that's when the lift starts.
My recommendation to learning step two is to stop and pause between every part. Again don't try to do the whole thing at once. Breathe in. Hold your breath. Pull the slack out. Hold it. Bring your shins to the bar slowly. Hold it. There's a lot of pausing and a lot of stopping in the learning process.
Do 4-5 sets of 5 reps — just like how you were practicing step one.
Step 3: Initiate Movement
The third step is lifting the bar off the floor.
Once your shins touch the bar, there shouldn’t be any delay in initiating an upward movement. You’ll extend from the knees, thinking about ‘pushing the floor away from you’.
At this point, everything should be all one action, where your hips and knees rise at the same tempo — not one before the other.
You don’t want to feel any ‘yanking’ sensation off the floor as you pull. Instead, it’s like you’re easing the bar off the ground to hold the tension through your lats and legs.
Final Thoughts
What looks fairly simple can be quite complicated when you're doing it under load.
My recommendation take your time in this learning process through each step.
The first movement is grabbing the barbell, flattening your back and breathing in. Then you’ll want to pull the slack out of the bar, bring your hips down while your shins touch the barbell. As soon as your shins touch you’re initiating upward movement.
About The Author
JP Cauchi
JP Cauchi is one of the leading strength and powerlifting experts in Australia and is a National Team Coach for Powerlifting Australia. Owner and Head Coach of The Strength Fortress, he has coached numerous national and international champions and medallists.