

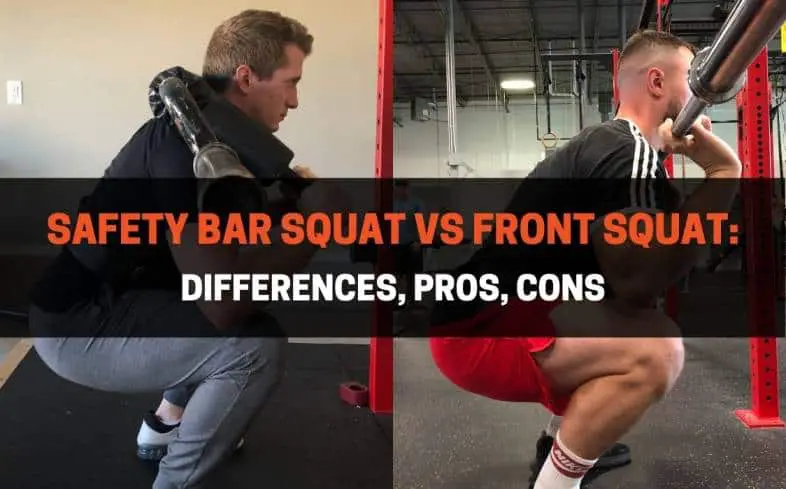
When lifters want a break from the regular back squat or they’re a competitive strength athlete, they often turn their attention to the safety bar squat or the front squat.
So, what are the differences between the safety bar squat vs front squat? Safety bar squats are performed using a specialty bar called a safety squat bar that has built-in shoulder pads and padded handles to hold. Front squats use a standard barbell that is placed on the front of the shoulders. Both squat exercises target the quads, hamstrings, glutes, and torso muscles.
In the article below, I’ll explain both of these squat variations in detail — including how, why, and when to incorporate each into your training program. Also, I’ll teach you how to perform each exercise correctly, overview their own pros and cons, and how to avoid common mistakes seen in both movements.
Let’s dive in!
Table of Contents
What’s The Difference Between a Safety Bar Squat and Front Squat?

The safety bar squat and front squat actually have a number of similarities when it comes to the muscle groups they target, and the intention for which they’re used for.
While these exercises shouldn’t be used interchangeably for athletes competing in olympic weightlifting, the safety bar squat and front squat can both develop the strength and hypertrophy of your legs when programmed correctly.
That said, there are some critical differences that you should understand if you want to maximize the strength and/or hypertrophy (muscle size) of your legs.
There are 4 main differences between the safety bar squat and front squat.
1. Equipment
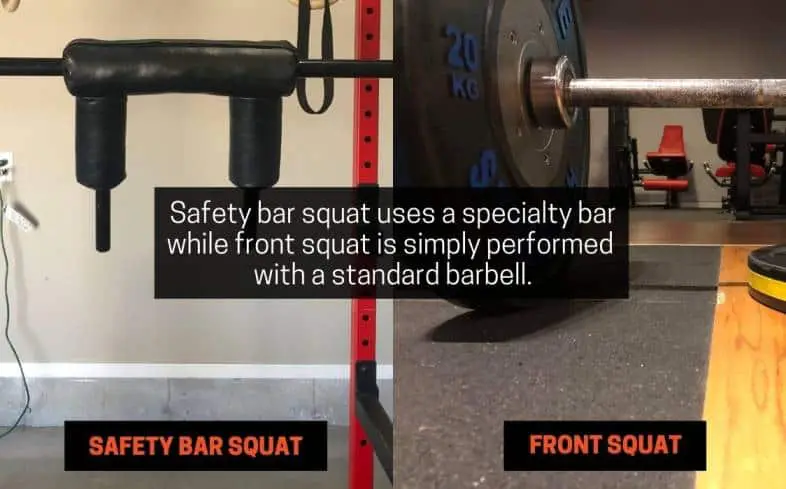
As you can tell from looking at both implements, the safety bar squat uses a specialty bar that has a pad going across the bar (that rests on your back) with two padded handles that provide padding for your shoulders.
The safety squat bar also has a cambered curve, that positions the load slightly forward and closely replicates the front squat.
On the other hand, the front squat is simply performed with a standard barbell.
2. Weight Used
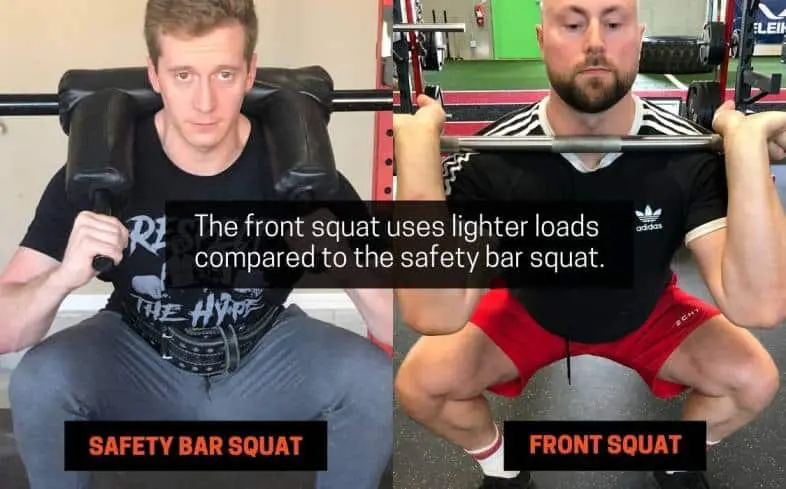
Having to maintain the barbell on the front of your shoulders during a front squat is probably the most challenging part of the exercise — not the actual work on your legs. Since the bar can be lost off the shoulders when the lifter’s upper back strength or endurance is lacking, the front squat uses lighter loads.
In addition, the design of the safety squat bar allows the lifter to actually lift their hands off the handles completely (provided the handles are in a neutral position) and the barbell won’t move.
Now, this is not to say that’s how you should use the safety bar. I’m only noting this so you understand the safety bar squat is significantly easier to keep on your shoulders.
3. Muscles Worked

In the safety bar squat and front squat, the differences in knee and hip angles are quite minimal. For this reason, there is little difference in how much work the lifter’s legs must do to lift the weight.
However, there is a substantial difference in the trunk muscles required between the two.
For example, the bar passively rests on the lifter’s shoulders during the safety bar squat. Unless they’re driving the handles up deliberately, the trunk muscles are just firing to keep the lifter upright.
However, the front squat demands active thoracic extension throughout the exercise — especially on the ascent. The position of the barbell on the front of the lifter’s shoulders gives them no opportunity to rest or the bar will roll out of their front-rack position.
Because of this, the front squat uses a greater amount of back strength and endurance to perform.
4. Mobility Required
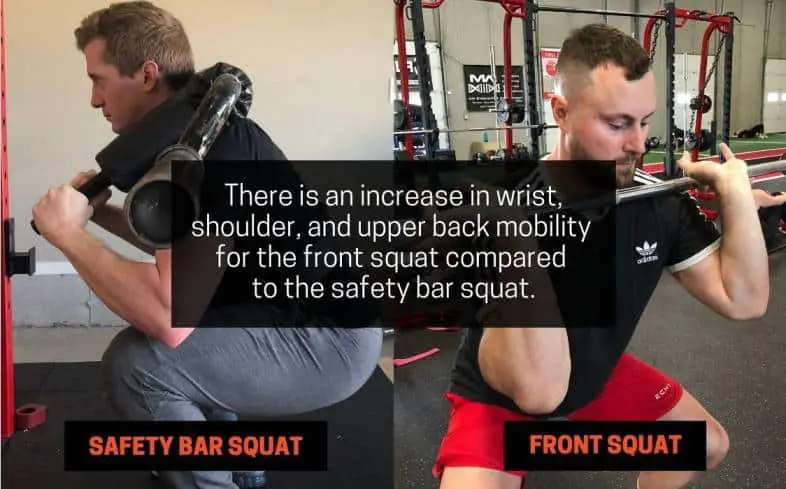
The wrist, shoulder, and upper back mobility required to establish the front rack position make the front squat a fairly demanding exercise to perform — at least as far as mobility goes.
On the contrary, the design of the safety squat bar completely eliminates the shoulder mobility needed in the traditional back squat. This makes the safety bar squat a fantastic squatting variation for those with limited upper-body mobility.
If you need a mobility routine before squatting, check out my article on How To Warm Up For Squats.
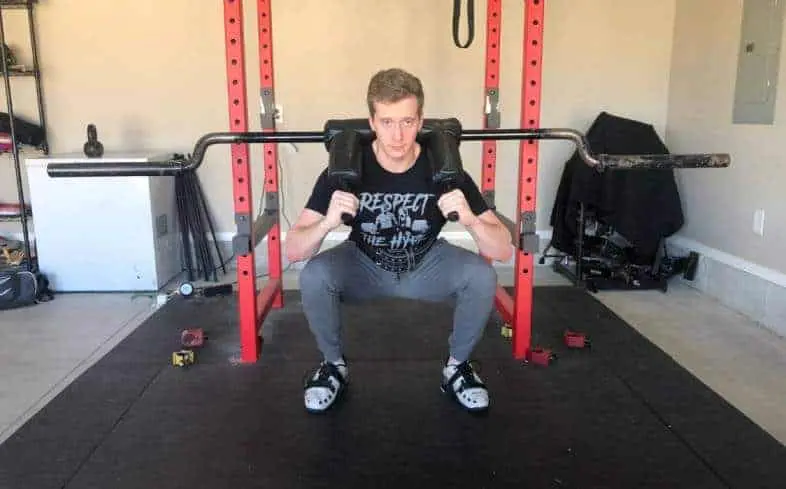
Safety Bar Squat
The safety bar squat requires the lifter to maintain a more vertical back angle when compared to the traditional back squat.
The more vertical torso angle will also force your knees to travel farther forward in order to keep your balance throughout the exercise.
How To Do a Safety Bar Squat
Here’s how to perform a safety bar squat:
1. Using a rack, place the bar at shoulder height
2. Put the barbell on top of your traps with the back pad in a comfortable position
3. Grab the handles and keep your elbows tucked into your sides
4. Stand up and take a couple steps back to clear the hooks
5. Bend simultaneously at your knees and hips to squat down
6. Stop once your thighs are parallel to the floor or slightly below
7. Drive your feet into the floor to return to the standing position
Not sure whether the safety bar squat is for you? Here’s 4 Reasons To Do Safety Bar Squats (Plus, How To Program It)
Technique Tips For a Safety Bar Squat
Here are some safety bar squat tips to help you with your technique:
- Perform low, moderate, and high rep sets. The safety bar squat isn’t just a strength building exercise, so don’t be afraid (or deliberately avoid) going beyond sets of 8 reps — especially if you’re focusing on hypertrophy or developing endurance-related work capacity.
- Mimic the position of a high bar squat. When performing the safety bar squat, the design of the bar should naturally place it on top of your traps. Simply dip under the bar and ensure it’s in a comfortable position on your back, then squat as you normally would.
- As a default, keep the handles neutral. The handles will naturally hang out slightly in front of your chest. In fact, you should be able to let go of the handles completely and the bar shouldn’t move.
- Handles up for a greater challenge. Although a neutral handle angle will likely feel best, you can produce a more difficult safety bar squat by holding the handles up and directly in line with your shoulders. This will bring the camber (and weight) more forward and make it quite challenging to avoid letting your chest fall on the way up.
Common Mistakes When Doing a Safety Bar Squat
The most common faults in the safety bar squat are:
- Wedging the bar too high. If the safety squat bar is placed too high above your traps, it will push into the back of your neck and head. This will likely cause your upper back to round forward and make you collapse forward during the ascent.
- Performing a good-morning-style squat. Although the bar rests passively on your back, don’t use that as an excuse to rely more on your posterior chain. Ensure that you’re still performing a squat pattern by driving your knees forward and out and your squat down — keeping them forward on the way up. Do this, and your quads will thank you down the road.
A safety bar squat is often used by lifters who experience wrist pain in the low bar squat. Check out my article How To Fix Wrist Pain While Squatting for more details.
Muscles Used: Safety Bar Squat
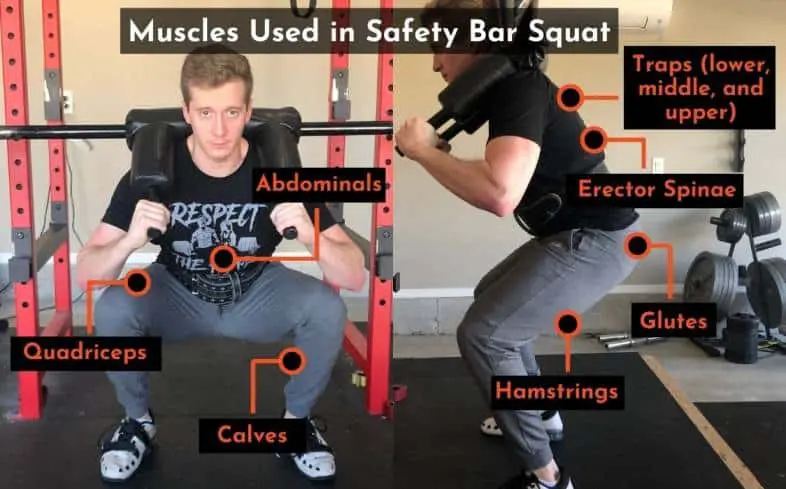
The muscles used in the safety bar squat are the:
- Quadriceps
- Hamstrings
- Glutes
- Calves
- Abdominals
- Erector Spinae (back muscles)
- Traps (lower, middle, and upper)
In order to stand up from a safety bar squat, the lifter needs a serious amount of extension in the knees and hips. These two actions place a high workload on the quads and glutes — the main drivers during this exercise.
However, the hamstrings and calves also assist with hip extension and knee extension (respectively).
Lastly, the remaining muscles assist in a secondary role by maintaining the rigidity of the torso in order to help the lifter to avoid collapsing forward.
If you’re interested in reading a more in-depth anatomy guide, check out my article on the Muscles Used In The Squat.
Benefits of The Safety Bar Squat
Some of the benefits of the safety bar squat are:
- Developing a strong set of quads is beneficial, as they’re the primary movers in the back squat.
- Comparable to back squats. A study by Vantrease and colleagues (2020) found that in recreationally trained men, safety bar squats appear to be similar to back squats when comparing muscle activation and bar speed at relative loads. This suggests that the safety squat bar might be as useful as a standard barbell for quad hypertrophy.
- Easier on your lower back. Hecker and colleagues (2019) found that in competitive powerlifters, the safety squat bar placed less stress on the lower back than the traditional back squat. For those with back problems, the safety bar squat might be a better choice.
- Work your upper back more. Hecker and colleagues (2019) also discovered that the safety squat bar results in a greater amount of lower trapezius activation when compared to a standard barbell (the one used in the back squat) — despite lighter weights being used.
Cons of The Safety Bar Squat
Some of the cons of the safety bar squat are:
- You may feel discomfort in your shoulders. Cheaply made safety squat bars will usually have a poorly-constructed 3-pad design that allows the bar to dig into your shoulders. Combine that with thin padding, and you have an easy recipe for shoulder pain. Ensure you’re using a high quality safety squat bar to avoid unnecessary discomfort.
- You’ll lift less than the back squat. When Hecker and colleagues tested the safety bar squat strength of competitive powerlifters, they found an 11% decrease in their 3-rep-maximum. If you’re looking to lift the most weight possible, choose the traditional back squat instead.
Front Squat
The front squat is a barbell squat variation that places the bar on the front of the lifter’s shoulders.
In the front squat, the barbell’s position on the front of the shoulders requires the lifter to push their knees farther forward in order to stay upright.
Although the front squat will place a high demand on the quads and glutes, it will also work the abdominals and thoracic muscles hard to keep the bar in position.
How To Do A Front Squat
Here’s how to perform a front squat:
1. Using a rack, place the bar at shoulder height
2. Wedge the bar in the crook of your shoulder
3. Place your hands just beyond shoulder-width and try to get the base of your four fingers around the bar
4. Drive your elbows up, so that your triceps are parallel to the floor
5. Stand up to lift the bar from the rack
6. Take a couple steps back, and set your squat stance
7. Bend at your knees, while trying to sit between your thighs to stay more upright
8. Stop once your thighs are parallel to the floor or slightly below
9. Push the floor away to stand up
Want to learn everything there is to know about the front squat? Check out my complete guide to the front squat here.
Technique Tips For a Front Squat

Here are some front squat tips to help you with your technique:
- Use a wide variety of reps. As a compound lower body exercise, it’s easy to want to load up this exercise in the 3-6 rep range only. While sets of 3-6 reps are great for strength-specific adaptations, you’ll certainly benefit from the 6-15 rep range, too.
- Try different grips. If you constantly get sore wrists from the olympic-style grip, there’s nothing wrong with putting straps on the bar and holding them instead of the barbell itself. Provided you’re not a competitive strength athlete who must do cleans in competition, this grip modification will be totally fine.
- Need to loosen up your wrists? Perform some light wrist and forearm stretches as you warm-up with the empty bar. Over time, you’ll adapt to the front-rack positioning and likely won’t need to stretch out — just a few warm-up sets and you’ll be ready to go.
Can’t manage the olympic grip or cross-grip? Check out my article on Front Squat With Straps: How And Why You Should Do It
Common Mistakes When Doing a Front Squat
The most common faults in the front squat are:
- Trying to force a full olympic grip. Unless you’re an olympic weightlifter or crossfit athlete, it’s not absolutely essential to get all four fingers around the barbell during your front squats. As a general rule, try to get at least 2 fingers (usually your index and middle fingers) around the bar to keep it in position.
- Going too heavy. Even for an experienced lifter, it’s extremely hard to maintain proper technique with the front squat as the limiting factor will be your upper back strength. Avoid going too heavy, so you don’t compromise the integrity of your technique.
Related Articles: Is The Front Squat Choking You? Try These 5 Tips and Is The Front Squat Bar Slipping? Try These 8 Tips.
Muscles Used: Front Squat
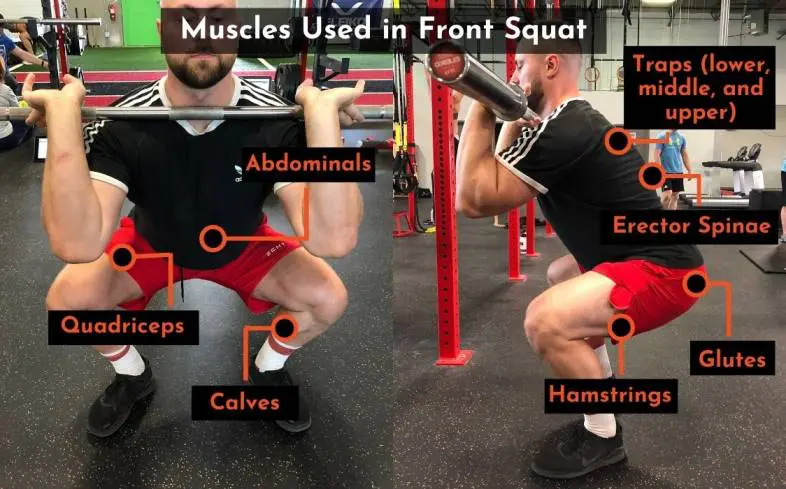
The muscles used in the safety bar squat are the:
- Quadriceps
- Hamstrings
- Glutes
- Calves
- Abdominals
- Erector Spinae (lower back muscles)
- Traps (lower, middle, and upper)
In the front squat, the lifter is predominantly performing knee extension and hip extension. These two actions are produced by the exercise’s main movers: the quads and glutes — respectively.
That said, the hamstrings assist in extending the hips and the calves also kick in to help out with knee extension.
Any remaining muscle groups have a minor (but still essential) role in helping the lifter stay upright and/or keeping the bar in position. These include: the abdominals, erector spinae, and the entire trapezius muscle group.
Benefits of The Front Squat
Some of the benefits of the front squat are:
- Getting that tapered-waist look. Building the size of your quads (especially their overall width) will assist in making your waist appear smaller.
- Solid quad hypertrophy. A study by Gullet and colleagues (2008) found that the front squat was just as effective as the back squat for recruiting muscle mass. As a result, we could likely infer that the same applies when comparing safety bar squats to front squats: neither one will be better for hypertrophy — even if greater loads can be used with the safety bar squat.
- Less compressive force on the knees. Gullet et al. (2008) also noticed that there were significantly less compressive forces and extensor moments in the front squat compared to the back squat. This suggests that the front squat might be a better choice for those with knee issues (ligament and meniscal tears).
Want the benefits of the front squat while performing a different variation? Make sure you read my article on 10 Highly Effective Front Squat Alternatives (With Pictures).
Cons of The Front Squat
Some of the cons of the front squat are:
- Your shoulders might bruise. If you’ve never front squatted before, the weight of the bar might cause some bruising on the front of your shoulders — don’t be too concerned. Within a couple weeks, you’ll adjust to the bar position and the nerves in your shoulders will get used to the pressure exerted by the barbell.
- You might feel like you’re choking. The front squat requires you to wedge the bar in the nook above your front delt. This placement often causes the bar to make contact with your throat, giving you the sensation that you’re choking. To lessen this feeling, you can extend your neck slightly backwards to give yourself more breathing room.
For those wondering why the squat bar hurts neck during workouts, our article provides in-depth insights and solutions.
Check out this related article: Front Squat Mobility: 17 Must-Do Exercises
Final Thoughts
Your choice to perform safety bar squats or front squats will largely depend on the training goal you’re trying to achieve.
Use safety bar squats if you’re tired of traditional back squats and still want to work your quads hard. The safety squat bar can be a good substitute in the event of a low back injury as it reduces the amount of work on your low back muscles.
Use front squats if you’re a competitive olympic lifter or crossfit athlete, as the more upright torso angle will likely have greater transfer to your strength in the clean and jerk.
Neither the safety bar squat or front squat is inherently better than the other. Rather, it depends on what exercise will support your goal the most.
If you liked this comparison, check out my other ones involving the front squat: