

The front deltoid is the muscle on the front of the shoulder. Despite being a relatively small muscle, the front deltoid plays a large role in almost every shoulder exercise.
The front deltoid can be isolated in various exercises, like variations of front raises. It can also work with other muscles to perform more complex movements like overhead presses. No matter your training goal, the front deltoid is an important muscle to train.
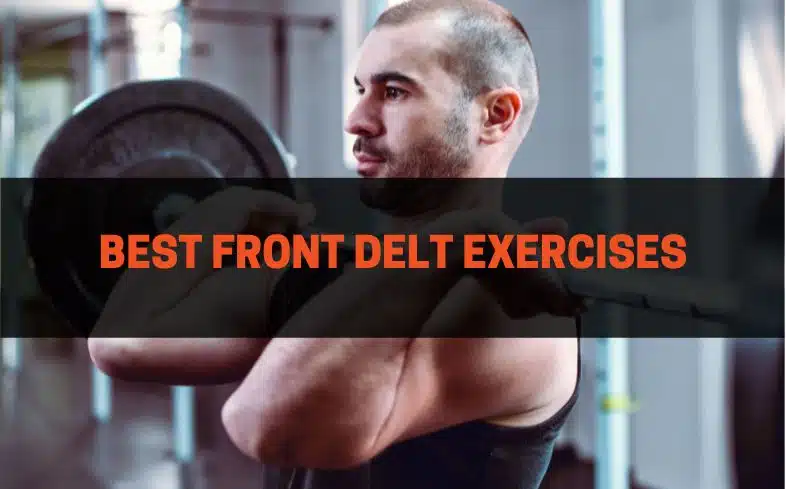
Here is a list of some of the 15 best front delt exercises:
- Dumbbell front raise
- Incline bench front raise
- Plate front raise
- Barbell front raise
- Dumbbell cross-body raise
- Cable cross-body raise
- Dumbbell fly
- Cable fly
- Fly machine
- Barbell overhead press
- Smith machine overhead press
- Dumbbell overhead press
- Arnold press
- Close grip bench press
- Incline bench press
Not every exercise will be right for your goals, so be sure to read to the end to learn how to do these exercises with expert tips.
You’ll also learn the basic anatomy and function of the front deltoids to better strengthen them. Understanding where and what muscles do makes it much easier to select the appropriate exercise.
At the end, you’ll learn the benefits of working your front delts, a sample workout routine, and front delt stretches.
Table of Contents
What Are the Front Delts and What Do They Do?
There are a total of three deltoid muscles:
- Front
- Lateral/medial (middle)
- Rear
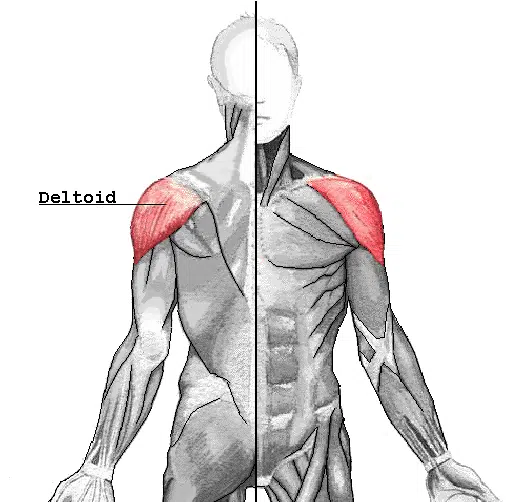
The front deltoid is the main focus and can be found on the front of the shoulder, next to your pectoralis major and above your bicep.
Anatomy of the Front Delt
The front deltoid, or the anterior deltoid (anterior means front), is a muscle located on the front of the shoulder. The front delt originates at the clavicle (collar bone) and inserts on the humerus (upper arm bone).
Based on its location, it shares many of the same functions as the pectoralis major. The pectoralis major is your large chest muscle, often called the “pec.” Based on their close proximity and attachment sites, both of these muscles perform many of the same functions (which I cover below).
Before getting into the function, it is important to understand where muscles attach. This information helps us better understand the exercises best target the muscle.
Since the front delt attaches to both the clavicle and humerus, it is easy to identify where the muscle fibers run. They run down from the clavicle to your arm. If you are ever in doubt about the function of a muscle, just follow the muscle fibers. They will tell you everything you need to know.
Based on how the front delts fibers run, I can tell you it is largely responsible for moving the arm up and in. I’ll dive into the function a lot more below.
Functions of the Front Delt
Understanding the function of a muscle makes it much easier to pick appropriate exercises for your specific goals.
The front delt performs two major bodily functions:
- Shoulder flexion (bringing the shoulder up)
- Shoulder horizontal adduction (bringing the shoulder in)
Knowing the exact terms is not necessarily important for exercise as long as you know the movements. To keep it simple, the front delt is responsible for bringing the shoulder/arm up towards the sky and inwards, towards your midline.
When I break down exercises, this is the flow I like to use:
Where is the muscle > What does the muscle do > Identify exercises
Multi-Joint Versus Single Joint Exercises
A multi-joint exercise is usually called a compound exercise and works multiple joins as the name implies. A single-joint exercise only uses one.
Multi-joint exercises target more muscles than single-joint exercises.
Regarding the 15 exercises below, you’ll see that the first nine are single-joint exercises, and the remaining six are compound exercises.
- Single joint exercises will help you improve muscular hypertrophy (increasing muscle size) or address specific weaknesses in a sport like powerlifting.
- Compound or multi-joint exercises are ideal for improving strength and power since you can rely on multiple muscle groups across multiple joints.
Many shoulder exercises involving the front delt will work closely with the chest (pectoralis major) and the triceps.
Do you have underdeveloped shoulders? Read the full article for 4 ways to fix this that work.
15 Front Delt Exercises
1. Dumbbell Front Raise
The dumbbell front raise is probably one of the most recognizable shoulder exercises out there and the most popular you’ll see in the gym. In my opinion, simple exercises are usually the best.
The dumbbell front raise is one of many variations in the front raise exercise (I’ll cover a lot of them in this article). The dumbbell variation is perfect for almost every gym environment. All you need is some space and some dumbbells.
How to do the dumbbell front raise
Before getting into individual steps, it is important to note that there are a few different ways to perform the dumbbell front raise. The exercise can be performed with one or two dumbbells, and you can choose from a few different grips.
There are three main grips:
- Pronated – palms facing down
- Supinated – palms facing up
- Neutral – palms facing each other
Performing the dumbbell front raise:
- Start by selecting your weight and space to perform the exercise (this exercise can be performed standing or seated).
- Have your weight at your side with your arms fully extended (this can be done with one or two weights).
- Start the movement by bringing the arm up towards the ceiling.
- The movement should come from the shoulder, the elbow should remain more or less static (you can have a slight bend).
- Stop at your desired range of motion (your arms parallel to the floor are a good reference point).
- Control the weight back to the starting position.
Pro Tip
When performing the dumbbell front raise, I like to incorporate multiple styles of grips during my set. For example, you can start your movement in the neutral grip position and rotate into the supinated or pronated position as you move through your range of motion.
This can make the front raise more comfortable. It can also keep the weight from hitting your body on the way down since the neutral grip position allows the dumbbells to sit at your sides.
2. Incline Bench Front Raise
This is a unique variation of the standard front raise and one that I do not see being performed very often. As the name would imply, this variation requires an incline bench.
Under most circumstances, this variation will require the use of dumbbells. While in the incline position, you are able to target your front delts more since it can be very difficult to compensate and use other parts of your body. With that in mind, you may not be able to lift as much weight using this variation.
Some of the same considerations can be made about your grip that we discussed above in the standard dumbbell front raise.
How to perform the incline bench front raise
- Select your weight and an adjustable or fixed inclined bench.
- Set the bench to a comfortable incline (I’d start around 80 degrees or so).
- Rest against the bench and allow your arms to fully extend at your sides.
- Keep your hands in a neutral position (palms facing in).
- Start the movement by raising the dumbbells toward the ceiling.
- The movement should come from the shoulder, and the elbow should remain more or less static (you can have a slight bend).
- Stop at your desired range of motion (your arms parallel to the floor are a good reference point).
- Once you clear your body, you can maintain the neutral grip position or rotate.
- Return the weight to the starting position (rotate back into your neutral grip if you altered it).
Pro Tip
You can perform this variation in reverse as well. I mean that instead of sitting on the bench, you can face the other way. This will look something like a seal row. This can be performed with either dumbbells or a barbell.
It can be awkward to get situated, so I recommend having a spotter hand you your weight or having a box or other platform you can safely grab the weight from.
This variation will be performed in the same fashion as other front raises, but now you’ll have support and something to drive into as you perform the front raise.
3. Plate Front Raise
Another common front raise variation is the plate front raise. You will use a weighted plate as resistance rather than a dumbbell or barbell for this exercise. This is an ideal variation if you cannot access the dumbbells you need (like if you are in a busy gym or at home).
In most cases, you may not have as many choices when it comes to weight. Most gyms will have plates that start at 5 to 10 pounds and then jump up to 25 to 45 pounds. So, you will need to keep this in mind.
How to perform the plate front raise
Before getting started, I recommend this variation be performed with both hands holding onto a single plate (like your holding a steering wheel). It can be performed with plates in each hand, but if you do this, I recommend using smaller plates.
This exercise can also be performed either standing or seated. The seated variation does reduce your total range of motion, though.
Performing the plate front raise:
- Select your weight and find enough space to perform the exercise safely.
- Grip the plate like a steering wheel (your hands should be even at about the 3 and 9 o'clock positions).
- Some plates will allow you to hold on with a full grip others may require more of a pinch grip (maintain constant pressure so you do not drop the plate).
- Like other variations, start the movements by driving your arms toward the ceiling.
- The movement should come from the shoulder, and the elbow should remain more or less static (you can have a slight bend).
- Stop at your desired range of motion (your arms parallel to the floor is a point of reference).
- Safely return the weight to the starting position, and make sure you do not hit yourself with the plate.
Pro Tip
When performing this exercise, you can add a layer of difficulty by rotating the plate at the top of the rep. Like a steering wheel, rotate your hands back and forth (to the 6 and 12 o'clock positions). I recommend performing the rotation per side.
You can also add an isometric component to the exercise. This will be a necessity if there are no grips on your plate. While performing your front raise, continuously drive your hands toward one another. This will cause both your front delts and pecs to work even harder.
4. Barbell Front Raise
Out of all of our front raise variations, the barbell version will probably be one of the more difficult choices. For most people, I do recommend using a fixed barbell. These are usually shorter than a standard Olympic barbell and will be easier to use (plus, you do not risk accidentally hitting something).
Since you are using a barbell, this exercise will require both hands. You can choose between a supinated (palms up) or pronated (palms down) position.
How to perform the barbell front raise
- Start by selecting your weight and finding enough space to perform the exercise safely.
- Choose your grip (supinated or pronated).
- Bring the weight to the starting position. You should be standing upright with your arms fully extended at your sides.
- The movement should come from the shoulder, the elbow should remain more or less static (you can have a slight bend).
- Stop at your desired range of motion (your arms parallel to the floor is a good point of reference).
- Safely return the weight to the starting position, and make sure you do not hit yourself with the barbell on the way down.
Pro Tip
When performing the barbell variation, I personally like to perform the exercise in a more stable position. This can help reduce compensation and allow you to target your front delts even more. This can be done by standing up against a wall or performing the incline bench variation discussed above.
5. Dumbbell Cross-Body Raise
When it comes to front raise variations, the cross-body is probably one of (if not) my favorite types. The cross-body variation will be the same as a standard front raise, but you bring the weight up and across your body instead of driving straight up and down.
Unlike the other variations, this exercise will be performed with a single dumbbell. You can not perform it with both arms at the same time.
How to perform the dumbbell cross-body raise
Before getting started, I recommend that this variation be performed in the supinated grip (palm facing up). This is far more comfortable and will allow you to drive the weight across your body.
When executing the movement, think about driving from one hip to the opposite shoulder (while keeping your arm more or less straight).
- Start by selecting your weight and finding enough space to perform the exercise safely.
- I recommend the supinated grip (you can start in a neutral position, but it should end in a supinated position).
- Start the rep by driving the weight across your body (start at one hip and raise to the opposite shoulder).
- The movement should come from the shoulder. I do recommend keeping a slight bend in your elbow.
- Once you have reached your desired range of motion, safely return the dumbbell to the starting position.
- Make sure to perform the exercise on both sides.
Pro Tip
When performing this exercise, I like to stand off to the side of a bench or something I can hold onto (I typically use an adjustable bench set to 90 degrees).
If you are starting on your right arm, you should be standing on the right side of the bench, so you can hold on with your left hand. This added stability could make the exercise more effective since it is easy to rotate and move your body when swinging a dumbbell from one side to the other.
6. Cable Cross-Body Raise
The cable version of the cross-body raise is an awesome exercise for your pecs and front delts. Depending on how it is performed, it will be very similar to a traditional low-to-high cable fly.
I recommend performing this exercise with a single cable when trying to target your front delt. Unlike a dumbbell, the cable will allow for constant tension on the muscle since it cannot just “rest” at your side.
How to perform the cable cross-body raise
As stated above, this exercise should be performed on one side at a time. You will need a bit more space with the cable, so I recommend either using a single stack cable (one on the end) or standing slightly off to the side so you do not block the other cable from being used.
This exercise shares many of the same characteristics as the dumbbell variation above.
Performing the cable cross-body raise:
- Start by selecting an appropriate weight, you will also need a D handle attachment (or something you are comfortable holding onto).
- I recommend the supinated grip, or somewhere between neutral and supinated (you can start in a neutral position, but it should end in a more supinated position).
- You will need to step slightly out from the weight stack so that there is tension on the cable.
- Start the rep by driving the handle across your body (start at one hip and raise to the opposite shoulder).
- The movement should come from the shoulder, I do recommend keeping a slight bend in your elbow.
- Once you have reached your desired range of motion, safely return the handle to the starting position.
- Make sure to perform the exercise on both sides.
Pro Tip
I mentioned earlier, but this exercise can easily be turned into a low-to-high cable fly. This variation will be a great movement for both the pecs and shoulders. To perform this exercise, you will need both weight stacks in a cable cross-over machine.
Instead of driving one hand across your body, you will have both hands meet up in the middle (at your midline). Like the plate front raise discussed above, I recommend driving the handles into one another (don’t smash your fingers). This will help add an isometric component to the movement.
This can be difficult to do in a busy gym, so make sure to respect others around you.
Want more cable machine workouts for mass? Read the full article.
7. Dumbbell Fly
The dumbbell fly will be the first of the “fly” exercises for the front delt. The fly is still a single-joint exercise like the front raise, but since the movement in the shoulder is changing (flexion to horizontal adduction), there will be far more work done in the pec.
Regardless of this, all flies are still great exercises you can use to target your front delts.
How to perform the dumbbell fly
Before getting started, the dumbbell fly will be similar to a standard dumbbell bench press. I do recommend you are comfortable with the press variation before moving onto the fly. You will not be able to fly the same weight you can press.
When performing the exercise, you will maintain a neutral grip position throughout the movement (palms facing in). You can also perform this exercise using an incline bench as well.
Performing the dumbbell fly:
- Position yourself comfortably on the bench, using a flat or adjustable bench.
- You will need to bring the weight to the starting position. I recommend using a spotter if you are not comfortable doing it yourself.
- Ensure you maintain five points of contact when on the bench.
- Both of your feet
- Butt
- Upper back
- Head
- Keep a slight bend in your elbows and start with the weight touching at the top (palms facing in).
- Let the weight travel down to a comfortable range of motion.
- It doesn’t need to go farther than around chest level (adjust as needed).
- Keeping your arms static, drive the weight back to the starting position.
- The movement should come from the shoulders (do not use your elbows).
- If you fear failing your rep at the bottom, you can simply press the weight up.
Pro Tip
When performing the dumbbell fly, my favorite way to modify it is to go to the ground. This not only gives you a built-in safety net, it can also let you lift even more weight. This can be a great alternative since if you fail the exercise, you can simply rest on the ground and stop.
If you want to add more weight, you can focus on the fly component on the way down and then shift into a floor press on the way back up. This is one of my go-to exercises for the chest and shoulders.
8. Cable Fly
The cable fly is going to have three variations:
- Low to high
- Middle
- High to low
To target the front delts, I would focus the most on the low to high variation (this is something I cover a bit in the cable cross-over exercise above). Each variation targets the pecs and the shoulders, which are all great exercises.
You will need a full cable crossover machine, which is not always easy in a busy gym.
How to perform the cable fly
When performing this exercise, you can choose between a neutral or staggered stance with your feet. The staggered stance is a bit more stable when lifting heavier weight.
- Start by selecting an appropriate weight. You will also need two D-handle attachments (or something you are comfortable holding onto).
- I recommend the supinated grip, or somewhere between neutral and supinated (you can start in a neutral position, but it should end in a more supinated position).
- You will need to step slightly out from the weight stack so that there is tension on the cable.
- Start the rep by driving the handle across your body (start at one hip and attempt to raise to the opposite shoulder).
- The movement should come from the shoulder, I do recommend keeping a slight bend in your elbow.
- The rep ends when both of your hands meet in the middle.
Pro Tip
If the space and equipment allow for it, I love adding a seated position for this exercise. Some machines will have built-in seats. For the standard cable crossover, you must bring over a fixed seated bench or an adjustable one.
This turns into a seated fly and gives you something to press against. It becomes easier to modify the range of motion, allowing you to emphasize your front delts more.
9. Fly Machine
This will be very similar to the cable fly (especially the seated version I mentioned above). This can be a much better variation since it does not take up as much space from other gym goers.
The fly machine is going to be set to a fixed position. You can adjust the seat height and your desired range of motion.
How to perform the fly machine
- Start by setting the machine up to your desired height and width (there are numbers on the handles to indicate their position).
- The weight is on a fixed path, so you do not need to worry about controlling the weight as much.
- Begin your rep by driving the handles towards the midline.
- The movement should come from the shoulder. I do recommend keeping a slight bend in your elbow.
- The rep ends when both hands meet in the middle.
- Safely return the weight to the starting position.
- I recommend putting one down at a time if the range is too high.
Pro Tip
One of my favorite ways to modify the fly machine is to perform it with a single arm. To do this, you must sit slightly off-center (towards the direction of your working arm). The single-arm variation can let you better target your front delt since you do not have to worry about the other side and can use your other hand for stability.
10. Barbell Overhead Press
I have reviewed many of the single-joint exercises above for the front delts. The barbell overhead press will be the first of the compound exercises.
Any overhead variation is essential if you want strong shoulders. This is, without a doubt, the most advanced exercise on this list. So I recommend being comfortable pressing a barbell overhead before trying this one. You can also use a power rack so that there are safety straps to help.
This exercise can be done with a standard Olympic or fixed barbell.
How to perform the barbell overhead press
- Start by setting up your barbell and power rack. The safety racks and J-cups should be set to your height.
- Grab the barbell with your hands just outside the shoulders, unrack it, and take a few steps back.
- Move your head back slightly and push the barbell overhead.
- As the barbell clears your head, move it back in under the bar.
- Safely return the weight to the starting position.
Pro Tip
The easiest way to improve this exercise is to add a push-press variation. The push-press incorporates your legs to assist in the movement. Before starting your rep, drop into a partial squat. As you come out of the squat, begin the press overhead.
I typically add this during my set as I begin to fail. It can help you lift a little more weight or finish a couple of extra reps before failing.
11. Seated Smith Machine Overhead Press
Lately, this has become one of my favorite shoulder exercises. The Smith machine often gets a bad rap, but it can be a great piece of gym equipment when used properly.
For this press, you will need to set up an adjustable bench. This may not always be an option in a busy gym.
I prefer the Smith machine that has an angled track to press. If this is the one you are using, set it up so that the angle of the track is coming back toward you.
Performing the seated Smith machine overhead press
- Start by setting up the bench. The bench should be upright (I prefer a slight incline).
- Set the bar to an appropriate height (you can also set the safety hooks).
- Grab the bar just outside of shoulder width and unrack from the Smith machine.
- Drive the weight up the tracks and toward the ceiling.
- Control the weight back down to the starting position.
Pro Tip
When performing your seated overhead presses, try setting the bench back a bit into a slight incline. This can make the exercise far more comfortable to perform.
12. Seated Dumbbell Overhead Press
Another great compound exercise, this is one of my favorites, and it is a great alternative to the overhead barbell press.
How to perform the dumbbell overhead press
- Start by selecting a type of weight and bench (I recommend using an adjustable bench and setting it to just before its final position).
- Have your weight out in front of you, keeping your elbows in (no wider than 45 degrees out).
- Ensure you maintain five points of contact even though you are in a seated position.
- Both of your feet
- Butt
- Upper back
- Head
- Drive the weight to the ceiling by raising your shoulders and extending your elbows.
- Make sure to keep your elbows in tight.
- With control, bring the weight back to the starting position.
Pro Tip
If you want to make this exercise more difficult and add a level of stability into the equation, try performing the exercise without the back support of the bench. In this position, you will not be able to lift the same amount of weight, but it is still challenging in its own right.
13. Arnold Press
The Arnold press is a popular variation of the standard shoulder press in the world of bodybuilding. Still, it is a great exercise to incorporate into any training program. It is a bit unique and requires more movement than a traditional should press. You will need to rotate the weight as you execute the movement.
How to perform the Arnold press
- Choose your weight and adjust a bench so the back is completely upright (you can have a slight incline).
- Curl your arms so the dumbbells are at your shoulders with your palms facing you.
- Press the dumbbells overhead as you rotate your arms so your palms face forward at the top.
- Return to the starting position by lowering your arms and rotating your palms so that they face you again.
Pro Tip
This is a great exercise for hypertrophy. If you find yourself beginning to fatigue when performing longer sets, you can always switch to a standard shoulder press to finish out a couple more reps.
Want more Arnold press alternatives? Read the full article.
14. Close Grip Bench Press
The close grip bench press and its many variations) are probably one of my favorite and easy variations to implement into your weekly training. It targets the same muscles as our standard bench press, but due to the “close grip,” more emphasis is placed on the front delts triceps.
How to perform the close grip bench press
- Set the bar to an appropriate height (with your arms fully extended above you, the barbell should be around the end of your forearm, near your wrist).
- Position yourself comfortably on the bench (a good starting point is to have your eyes directly under the racked barbell).
- Ensure you maintain five points of contact
- Both of your feet
- Butt
- Upper back
- Head
- Lift the weight over your chest (use a spotter if necessary).
- Let the weight come down (for a close grip, the weight doesn’t always have to touch your chest).
- Try to keep the forearms straight and extend the elbows to return the weight to the start position.
Pro Tip
The term “close grip” can be applied to many different exercises. It does not only have to apply to traditional bench presses. You can add this alternative to just about any exercise that you want. For example, close grip incline press, close grip dumbbell press, and close grip push-ups.
15. Incline Bench Press
The incline is a great variation to your standard bench press. It is the perfect middle ground between the flat bench and the barbell shoulder press. This will be one of the best compound barbell movements for your front delts.
Incorporate the incline press if you are trying to strengthen your front delts.
The setup for the incline press might be slightly different depending on the equipment you have access to.
How to perform the incline press
- Set the bar to an appropriate height (with your arms fully extended above you, the barbell should be at around the end of your forearm, near your wrist).
- Position yourself comfortably on the bench (a good starting point is to have your eyes directly under the racked barbell).
- Ensure you maintain five points of contact
- Both of your feet
- Butt
- Upper back
- Head
- Lift the weight over your chest (use a spotter if necessary).
- Let the weight come down (for a close grip, the weight doesn’t always have to touch your chest).
- Try to keep the forearms straight and extend the elbows to return the weight to the start position.
Pro Tip
If you have a squat or power rack available, I highly suggest setting it up there instead of the fixed incline bench most gyms have. The power rack allows you to adjust the J-cups and add safety bars. Spotting the incline press can be difficult, so a power rack is your best option.
Front Delt Programming Considerations

Before adding these front delt exercises to your routine, you can consider our recommendations for the number of reps and sets based on your goals.
Muscular Endurance
- Repetitions are moderate to high: 12+
- Sets are typically lower: 1 – 3
- Lower training intensities, starting around 50% of a 1RM
- Lower rest periods: 30 – 60 seconds
Muscular Hypertrophy
- Repetitions are low to moderate: 6 – 12
- Sets can be moderate to high: 3 – 6
- Intermediate training intensities: 75 – 85% of a 1RM
- Lower rest periods: 30 – 60+ seconds (this can greatly vary based on the individual)
Strength
- Repetitions are pretty low: 1 – 5
- Sets are much higher: 4 – 6
- Training intensity is close to or at maximum: 85 – 100% of a 1RM
- Higher rest periods: 2 – 5 minutes
Want the best powerlifting shoulder workouts? Read the full article.
Sample Front Delt Workout

There are going to be several ways to create a workout for your front delts or shoulders in general. The first thing you want to consider is…
Is your workout focusing entirely on the shoulders, or are you training your shoulders and other body parts?
This choice can affect your chosen exercises and the order to execute them in. Here is a simple plan for developing workouts:
First compound exercise > Second compound exercise > 2-3 accessory exercises
Sample Workout:
The workout below will cover a press-focused hypertrophy workout emphasizing the front delts.
- Incline bench press: 3 sets of 10-12 reps, 2 minutes of rest between sets
- Seated Smith machine overhead press: 3 sets of 10-12 reps, 2 minutes of rest between sets
- Standing barbell or dumbbell front raise: 3 sets of 5-10 reps (supinated and pronated), 2 minutes of rest between sets
- Single arm dumbbell cross-over raise (use a bench for support): 3 sets of 8 reps per side
How to Stretch the Front Delts
Here's a step-by-step guide on how to stretch the front delts:
- Stand up straight with your feet shoulder-width apart.
- Extend your right arm straight out in front of you at shoulder level, with your palm facing down.
- Take your left arm and reach it across your body, placing your left hand on your right elbow.
- Gently pull your right arm across your body towards your left side until you feel a stretch in the front of your right shoulder. Hold this position for 20-30 seconds.
- Release the stretch and return your right arm to the starting position.
- Repeat the stretch on the other side. Extend your left arm straight out in front of you at shoulder level, and use your right hand to pull your left arm across your body.
- Hold the stretch for 20-30 seconds, feeling the stretch in the front of your left shoulder.
- Release the stretch and return your left arm to the starting position.
- Repeat the entire sequence for each side 2-3 times, or as desired.
- Remember to breathe deeply and relax your body as you perform the stretch.
- If you feel any pain or discomfort during the stretch, ease up or stop the stretch altogether. It's important to listen to your body and not push beyond your limits.
Stretching the front delts can help improve flexibility, relieve tension, and reduce the risk of injury. Make sure to warm up your body before stretching and perform these stretches regularly to maintain flexibility and promote overall shoulder health.
Frequently Asked Questions
Should you train the front delts specifically?
Absolutely, there is not a muscle in the body you can train specifically. The front delt shares the same functions as your pec and works alongside the tricep, so there will always be some crossover when training the front delts.
How can I make the front delts bigger?
When trying to increase the size of a muscle, your answer is training for muscular hypertrophy. This type of training combines higher-intensity work with high volume. This will be your best bet for increasing the size of your front delts.
Do bicep curls work the front delts?
It depends on how the exercise is being performed. Generally, I would say no. The bicep curl focuses on elbow flexion, while the front delts focus on shoulder flexion. Based on their close proximity, the front delt can try to assist your curl by flexing the shoulder simultaneously.
Final Thoughts
Whether you are training for strength, hypertrophy, or anything, these front delt exercises will always be a great component to any program.
The front delts assist in almost every shoulder movement in front of the body, and they play a large role in some of the biggest compound exercises like the bench press and overhead press.
About The Author

Jace Fuchs has his MS in kinesiology and sports performance and is currently in the process of getting his Ph.D. in exercise and sports science. Jace has worked within the fitness industry for the better part of a decade now, and before his time in fitness, served in the US Army Infantry. When not writing for Powerlifting Techniques, Jace works as a content developer for the National Academy of Sports Medicine (NASM) and as a part-time exercise science professor. Outside of work, Jace is an avid powerlifter and strength-training enthusiast.